What is the number one way to combat an insect problem in the garden? Know your pest. The answer is that simple. Correct identification of the pest is essential in any type of garden management.
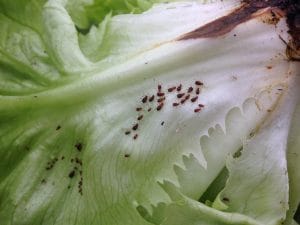
Aphids on lettuce
Step #1 Correct identification
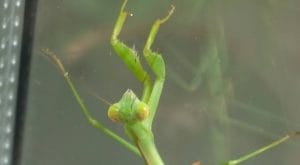
Sadly, I have often seen gardeners find signs of a pest and immediately reach for an overall insecticide without properly identifying the problematic insect. This can be detrimental to your garden. Insecticides can kill insects that are beneficial to your garden, like pollinators and insect predators.
This praying mantis is beneficial to your garden.
Step #2 Learn about the lifecycle and biology of the pest
Once the pest is correctly identified, a major part of growing organically or using integrated pest management (IPM) is learning about the insect to develop a plan of control. Learn about the life cycle and biology of your pest. Knowing all you can about a pest so you can manage that pest is just common sense.
For example, Mexican bean beetles lay their eggs in garden debris. Knowing that, you can help lessen your bean beetle problems by cleaning up your garden at the end of the summer.
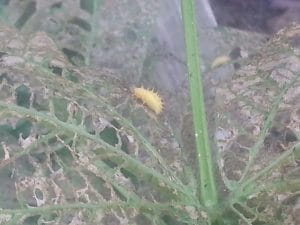
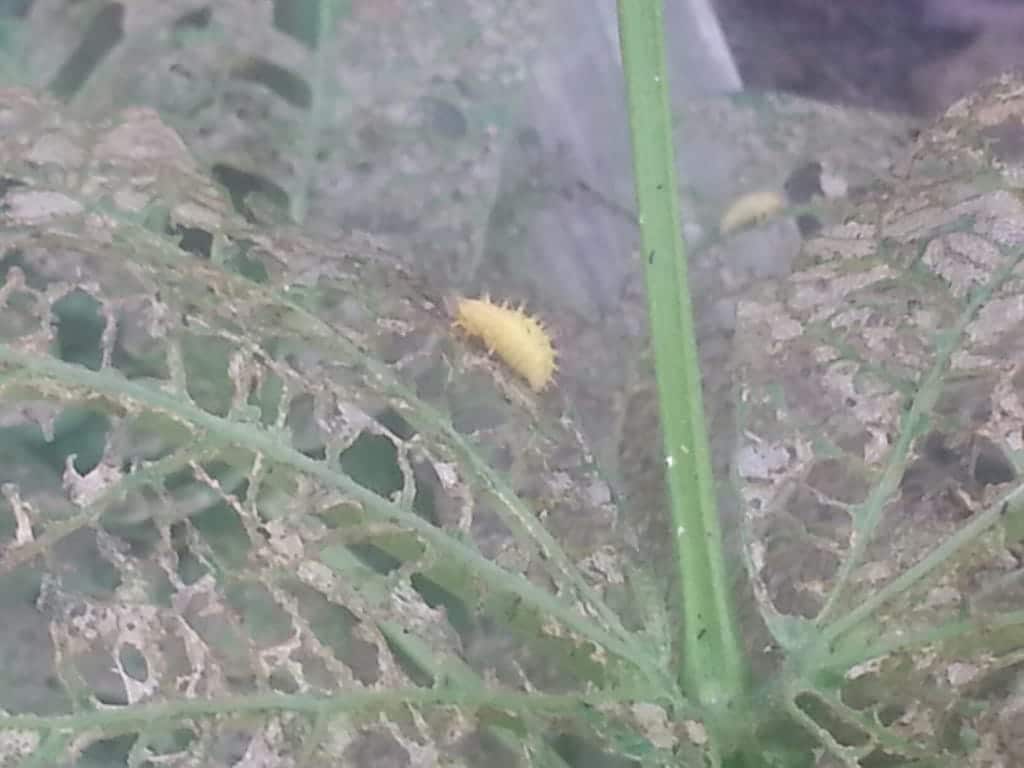
Mexican bean beetle larva
Planting early, using netting, and choosing resistant varieties are all effective strategies that work in pest management IF the pest is known. Too much science for you? Your local UGA Extension agent is the resource to help you. Use his/her entomological skills to make your garden better!
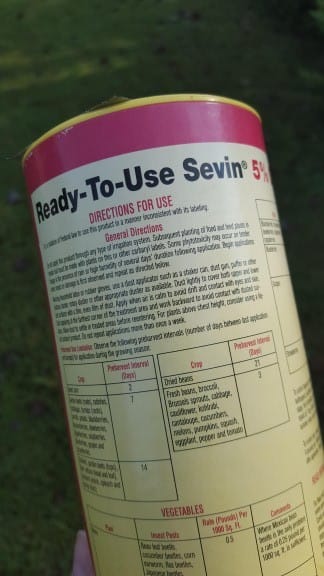
And, remember that when using any insecticide the label instructions are the law!
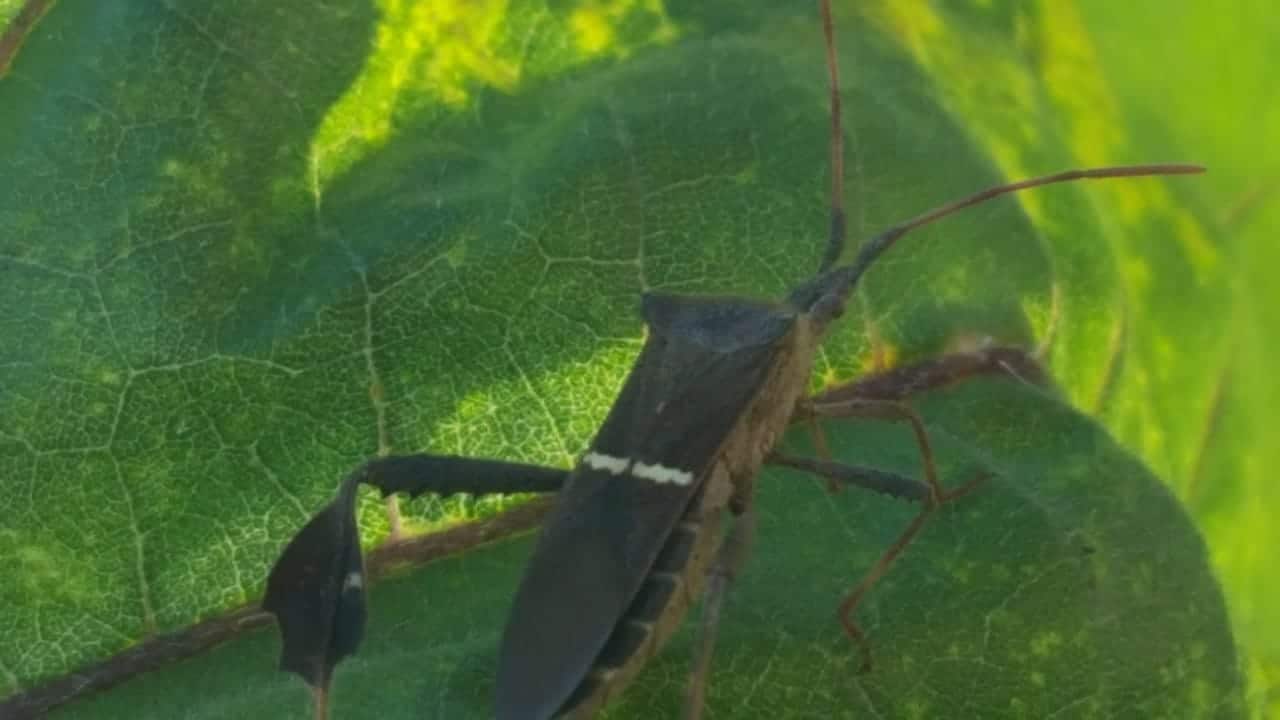
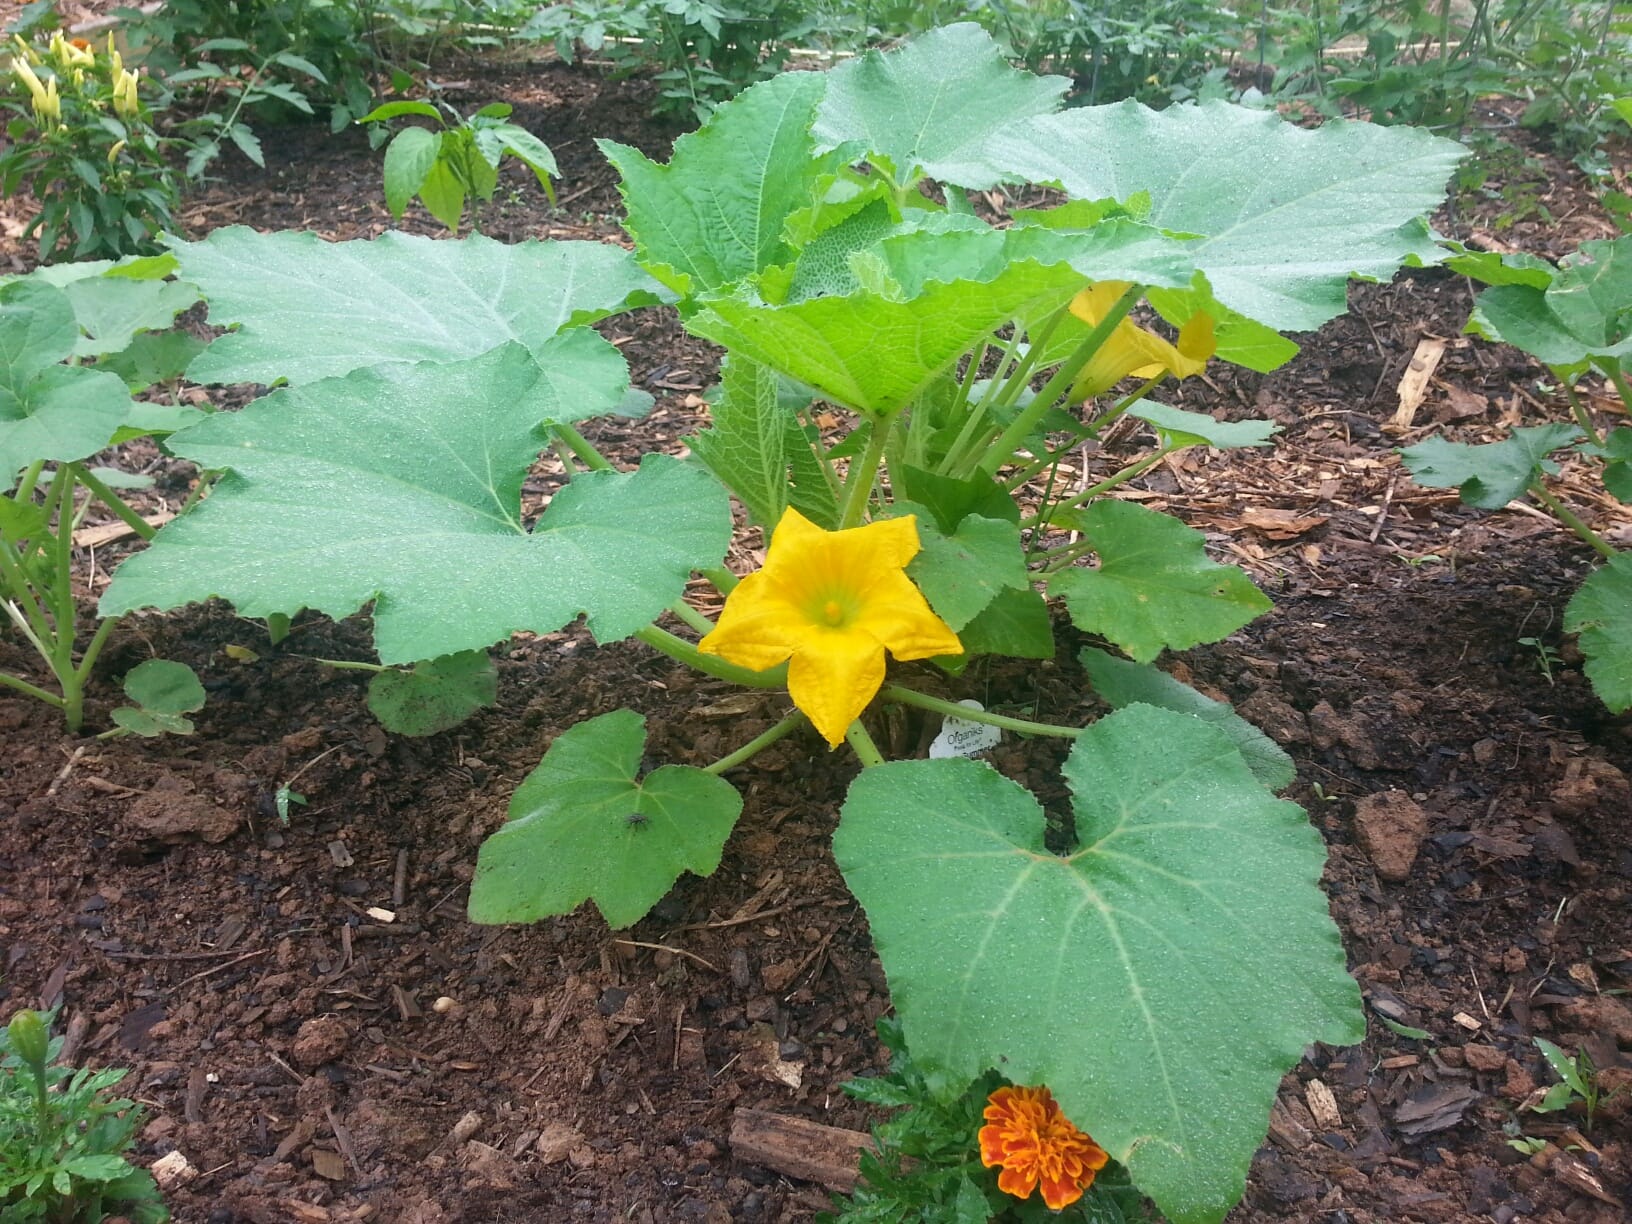
This week’s garden mission – eliminate squash bug eggs before they become squash bugs!
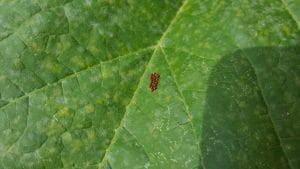
Scouting for pests in your garden on a regular basis is a MUST. Scouting alerts you to problems before they get out of hand. This time of the year as you scout among your squash plants you may see squash bug eggs. They are not too hard to spot and should be in a cluster:
Squash bug eggs appear in a cluster.
If you find an egg cluster congratulate yourself because you can now stop this pest cycle. There are several ways to do this. You could remove this leaf. Or, flick the eggs off the leaf with your fingernail but you run the risk of just moving a viable egg that could eventually become a squash bug. There is an easy way to get rid of these eggs and keep the squash leaf intact.
First, cut a short length of tape. Clear packing tape seems to work very well:
Clear packing tape works well.
Next, press the tape on top of the eggs. Press firmly and move the tape around a bit. The eggs stick to the tape:
Press firmly so the eggs attach to the tape.The tape lifts the eggs off of the plant while leaving the leaf intact.
Finally, remove the tape and fold it. Crush the eggs within the folded tape and your potential pest problem is removed. Notice the squash leaf is intact.
If you miss scouting and missed finding the squash eggs, the eggs hatch and these squash nymphs become squash bugs:
Eggs hatch into nymphs that are on their way to become squash bugs!
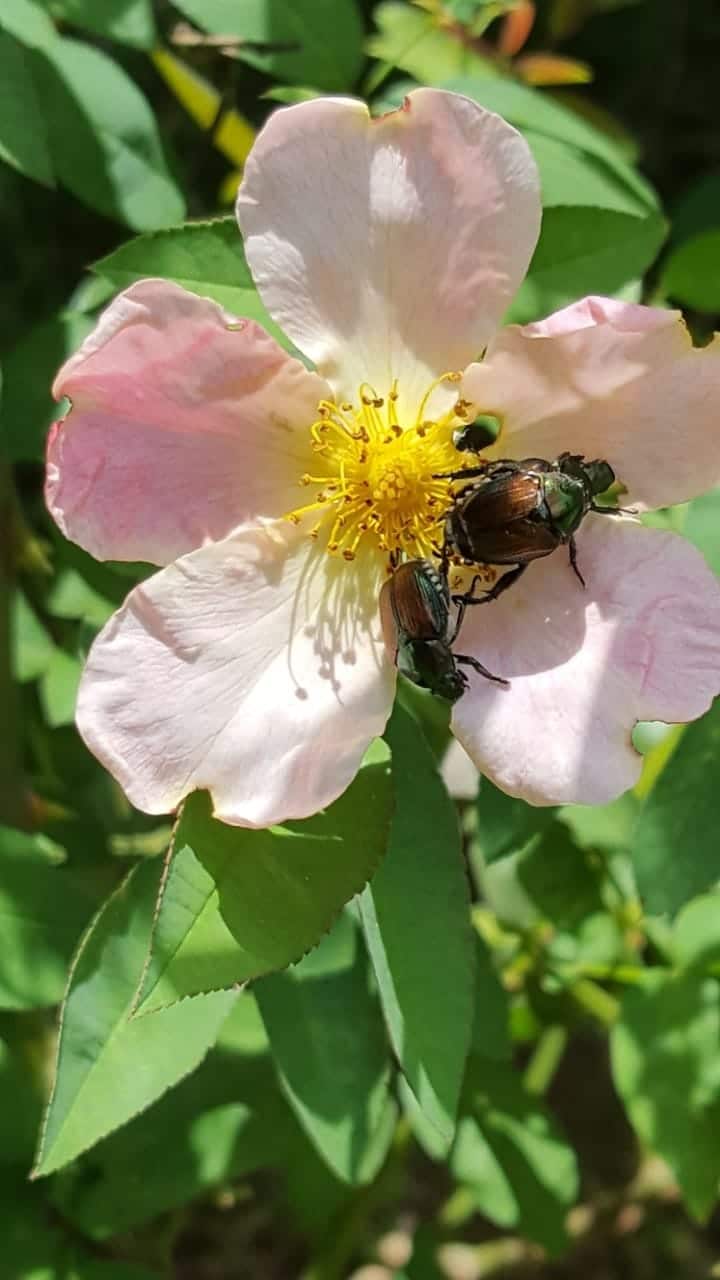
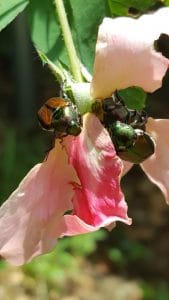
They are indeed back. You have probably already seen Japanese Beetles (Popillia japonica) in your landscape. They enjoy munching the leaves of roses, maple trees, cherry trees, peaches and grapes. They actually are a pest to over 300 plant species. A single beetle doesn’t do much damage. Unfortunately once a beetle finds a food source other beetles soon follow. It is the groups of beetles that do real damage.
These beetles will eat the leaves and petals of plants in the rose family.
Japanese beetles first arrived in the United States around 1917. As with many non-native species, in their home country of Japan they are not a major problem. This pest causes damage in the adult beetle stage as well as the larval stage. The larvae, or grubs, live in the soil and can do damage to plant roots.
We often get questions from gardeners about these pests and thought it might be helpful to share them with you:
Do you need to worry about this pest?
The Japanese Beetle season lasts 4-6 weeks, so realize they won’t be around for very long. They are not a major pest of vegetable gardens and generally eat the leave margins leaving a lacy-type leaf. They sometimes also eat petals and can damage fruit.
Do the Beetle Traps Work?
Yes, the beetle traps do work by attracting beetles from all over your area and bringing them to your yard! The traps contain a pheromone, a sex attractant, that can attract beetles that may not have visited your garden on their own.
If you decide to use traps, do not put them in the middle of your garden as you would just be bringing in additional numbers of the pests. Also, the traps will need to be emptied often. The dead beetles give off an ammonia scent that will repel other beetles.
Wouldn’t it be nice if your neighbors put out traps to attract your beetles to their yards?
Is Their a Non-Chemical Control?
Most home or community gardeners can control Japanese Beetles by simply picking the insects off the plants and dropping them in a container of soapy water. By regularly scouting for these insects and removing them, you will prevent any real damage. This is a great job for kids.
What if I Decide I Need an Insecticide?
There are insecticides available to kill Japanese Beetles but realize that the chemicals don’t affect just those beetles but possibly beneficial insects as well. Contact your local UGA Extension Agent for a specific chemical recommendation. As with all pesticides you will want to follow the label directions to the letter.
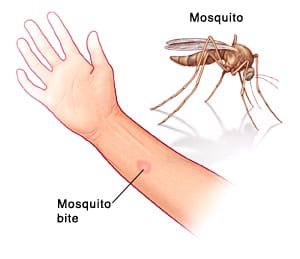
Are you especially concerned about mosquitoes this summer as you work in your garden? Do you wonder how to care for your bird baths so that your birds are happy but you are not creating a breeding pond for mosquitoes? We had the opportunity to talk with University of Georgia’s mosquito specialist, Elmer Gray, and asked him for some research-based mosquito information.
Adding pollinator spaces to your community or school garden is a fabulous idea. If you are a food grower, more pollinators means more pollination and increased food production! Even if you aren’t growing food the benefits of attracting native bees, butterflies, and even honey bees are numerous.
Honey bee on winter honeysuckle
UGA’s Center for Urban Agriculture has created the Pollinator Spaces Project. The mission is to make it easy to add pollinator habitat to any sized garden. The process is easy:
Step #1 Learn
Learn about pollinators and pollinator plants using the Pollinator Spaces Project webpage. The page includes a research-based plant list as well as links to pollinator events around the state and instructions on building bee homes and butterfly puddles.
Step #2 Create
Create your pollinator space. Your garden can be as simple or as detailed as you want to make it.
Step #3 Share
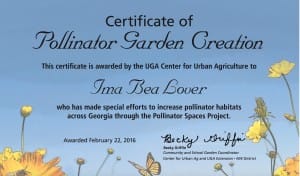
Once your garden is complete and blooming send Becky Griffin (beckygri@uga.edu), our community and school garden coordinator, a photo of your new space. Be creative. If you work in a school garden, get your students in the picture. When sending your photograph include some information about your garden. You will then receive a beautiful certificate acknowledging your participation in this part of Georgia pollinator history.
At the end of 2016 we will create a map of Georgia showing the new pollinator spaces and we will design a storyboard telling the story of the project. We will also feature new garden spaces during the year on our UGA Community and School Gardens Facebook page.
During the year we will be sharing pollinator facts, tips, and information through the webpage and the Facebook page. So stay tuned!
Make 2016 the year YOU help pollinators by adding a pollinator space to your garden. For more information about the project contact Becky at beckygri@uga.edu. If you want more information on creating a garden unique to your area your local UGA Extension agent is a great resource.
Because of real concerns about our pollinator population the Environmental Protection Agency (EPA) asked each state to develop a customized pollinator protection plan with recommendations on improving pollinator health. This is not a regulatory document but just guidelines to help our pollinators.
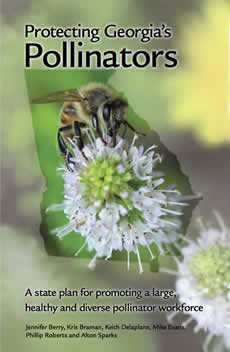
Georgia’s plan is finished! Protecting Georgia’s Pollinators (PGP) was developed as a joint effort between UGA’s Department of Entomology and the Georgia Department of Agriculture. The author committee is made up of Jennifer Berry, Kris Braman, Keith Delaplane, Mike Evans, Philip Roberts, and Alton Sparks. Those of you who are beekeepers may recognize several of these names as people heavily involved in pollinator research.
The draft of the plan was sent to over 35 groups across the state for their input – Georgia Beekeepers Association, Georgia Fruit and Vegetable Growers Association, the Peach Commission, the Blueberry Commission to name a few. The result is a plan that has a role for all of Georgia’s citizens.
As community and school gardeners we have a vested interest in pollinator health. More pollinators means more food from our gardens. Not to mention the beauty of enjoying the insects at work.
Guidelines from the pollinator plan that we can garden by include:
If possible leave areas of your property permanently undisturbed for soil-nesting bees. Sun-drenched patches of bare soil, roadsides, ditch banks, and woodland edges are prime bee habitats.
Dedicate pollinator habitat spaces in your garden.UGA’s Pollinator Spaces Project has many resources to help with this. Bees need a season-long unbroken succession of bloom. Many plant species bloom in the spring. Remember to plant plants to bloom in mid- to late-summer including Vitex, sages, and sunflowers. Your local UGA Extension office will have information on what pollinator plants grow well in your area.
Pollinator spaces are useful and beautiful!
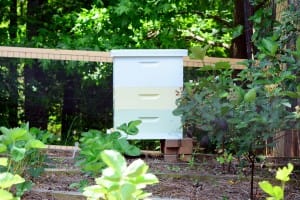
Know the beekeepers in your area. If your garden has a bee hive you want to be very careful about pesticide application and you will want to review in detail the section on pesticide users in the plan.
Bee hives can be located in urban areas
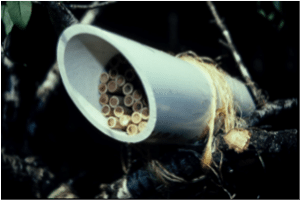
Consider increasing bee nesting sites by providing bee homes. These consist of solid wood pre-drilled with 1/4 to 1/2 inch holes that are at least 3-inches deep. It is important that the tunnels terminate in dead-ends. These are easy to create and a nice addition to any garden.
A easily constructed bee home – photo from PGP
Educate your gardeners about insect behavior. For example, the flight and nesting behavior of certain solitary bees happens in bursts of extreme activity. In the spring or summer you may see a large number of bees flying out of tunnels in the grass over your garden all at once. These are solitary bees and they are gentle, and their sting risk is extremely low! Enjoy watching them!
Digger Bee Nests
If you think insects are a problem in your garden take steps to correctly identify the insects and determine, with the help of your UGA Cooperative Extension Agent, if remedial action is necessary.
If your garden is located in a park or other public space that is maintained by local landscape crews, make sure that if they need to apply insecticide for turf pests that they mow the grass immediately before applying the pesticide. The mowing will get rid of weed flowers that may attract bees.
Clover, a bee favorite, is often found in lawns.
Follow all pesticide label directions and precautionary statements. THIS IS THE LAW. EPA is now requiring a “Protection of Pollinators” advisory box on certain pesticides labels. Look for the bee hazard icon and instructions for protecting bees and other pollinators.
Bee Hazard logo – photo from PGP
Take some time to look at Protecting Georgia’s Pollinators and you will see we all have a role to play. If you need any information about the plan or protecting pollinators contact your local UGA Cooperative Extension Agent.
Using pesticides can be intimidating. When using pesticides all gardeners want to get it right. We want to eliminate the pest with little consequence to our plants, our health or the environment.
UGA Extension partnered with Extension services from Alabama, North Carolina and Mississippi to create some helpful rules for pesticide applications.
Dr. Ellen Bauske, part of the development team, says “Gardeners need simple, straight-forward guidance on pesticide use.”
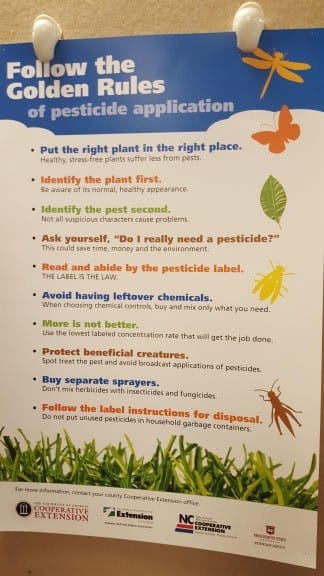
Follow the Golden Rules
Put the right plant in the right place. Healthy, stress-free plants suffer less from pests.
Identify the plant first. Be aware of its normal, healthy appearance.
Identify the pest second. Not all suspicious characters cause problems.
Ask yourself, “Do I really need a pesticide?” This could save time, money and the environment.
Read and abide by the pesticide label. THE LABEL IS THE LAW.
Avoid having leftover chemicals. When choosing chemical controls, buy and mix only what you need.
More is not better. Use the lowest labeled concentration rate that will get the job done.
Protect beneficial creatures. Spot treat the pest and avoid broadcast applications of pesticides.
Buy separate sprayers. Don’t mix herbicides with insecticides and fungicides.
Follow the label instructions for disposal. Do not put unused pesticides in household garbage containers.
If you have any questions about identifying a pest or determining what pesticide to use don’t hesitate to contact your local UGA Extension agent. He/she is trained to help you.
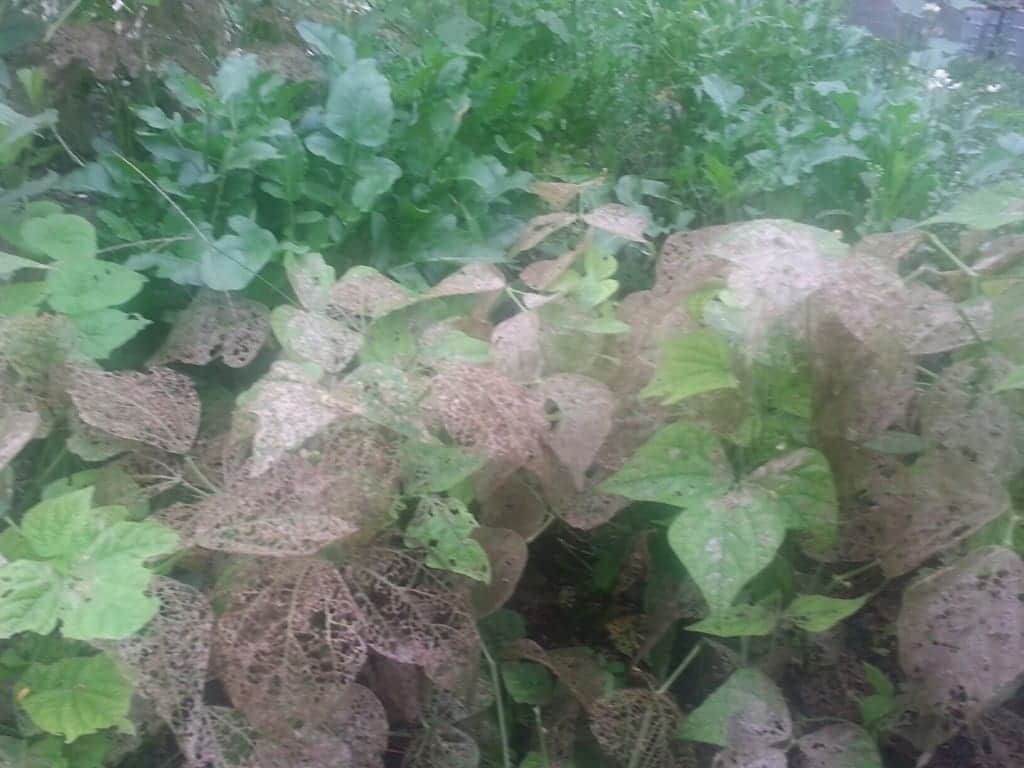
July and August are prime Mexican bean beetle times. They can leave your bean plants looking like lace. Sadly, this is a common occurrence across Georgia during the summer months.
Mexican bean beetle damage
As with any pest, it is best to learn a bit about the biology of the Mexican bean beetle so you can better control the damage.
Adult beetles, which look a bit like lady beetles, overwinter in garden debris. Cleaning out your community or school garden plots could help. Keeping nearby ditches clean could also help.
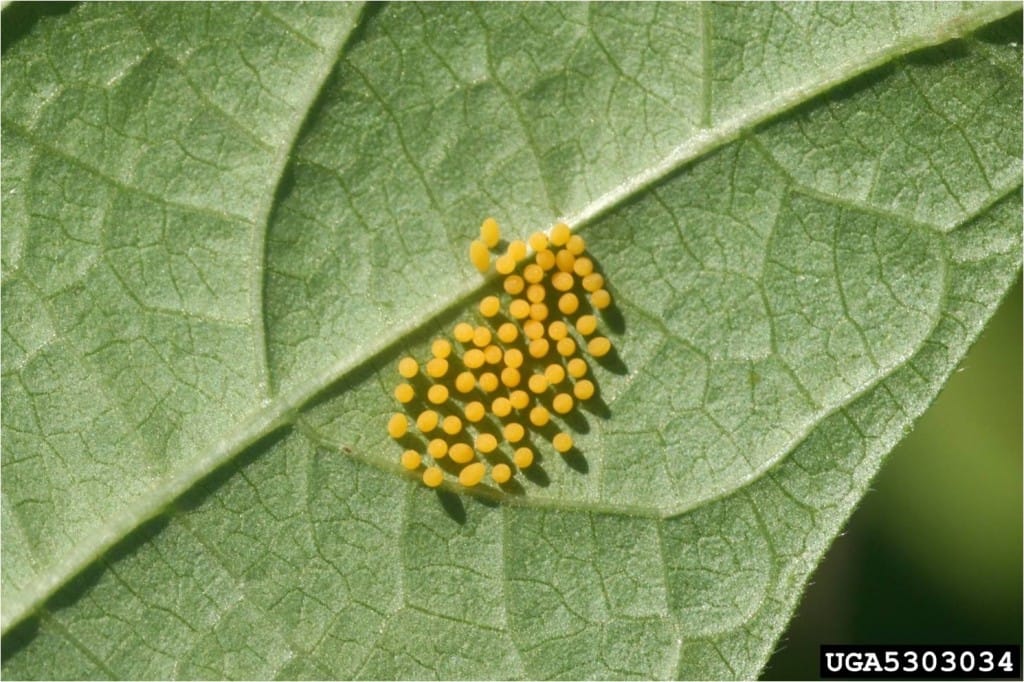
The beetles emerge in the warm temperatures of spring and look for young beans, soybeans, and lima beans. The adult female will feed on the underside of leaves and will lay 40 or more yellow eggs also on the underside of leaves. Pest scouting needs to include looking at the underside of leaves. If you can catch the pest in the egg stage simply remove the leave and dispose of it away from the garden.
Mexican bean beetle eggs Whitney Cranshaw, Colorado State University, www.bugwood.org
Once eggs hatch the larvae begin eating from the underside of the leaves. They will feed for 2 to 4 weeks and do alot of damage before they pupate on the plant. There are usually 3 to 4 generations per year. If you see just a few larvae, crush them by hand.
Larva on what is left of a bush bean plant in a Georgia community garden plot.
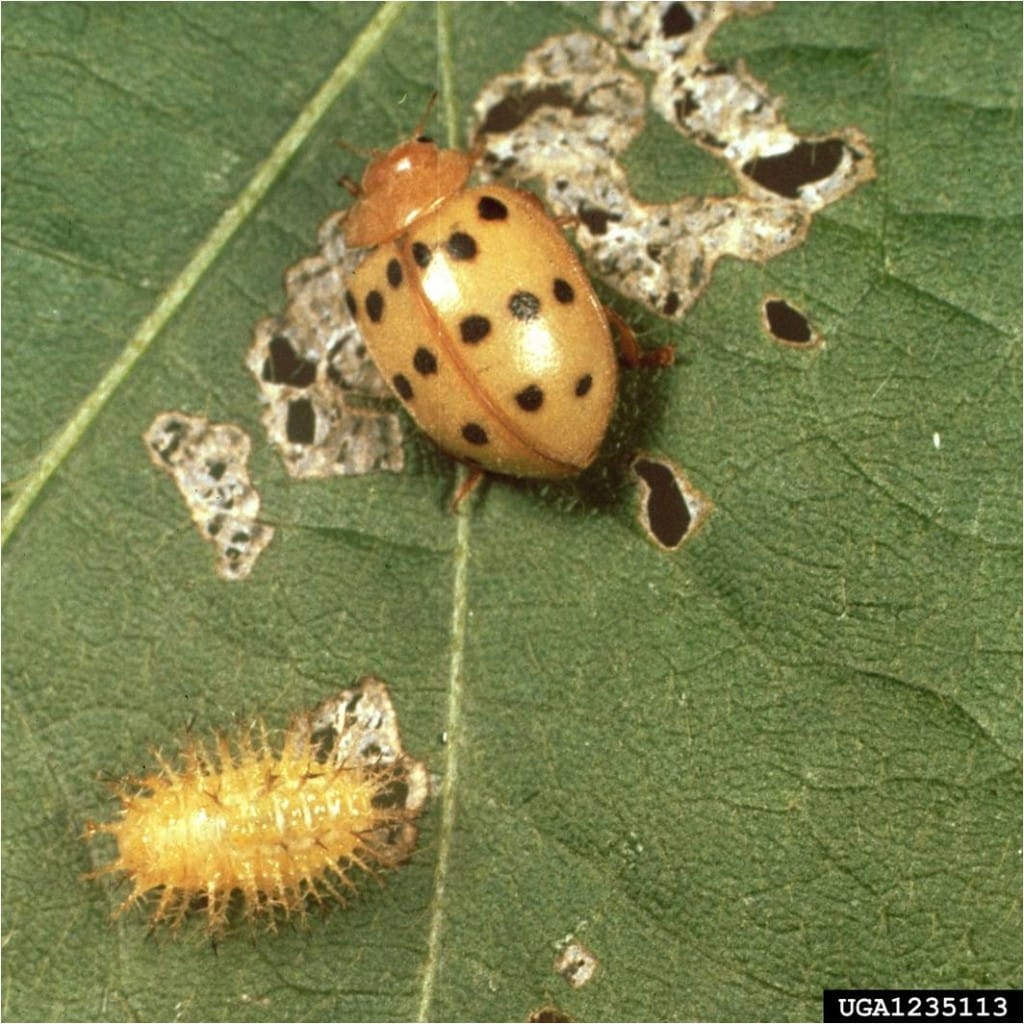
From egg to adult takes about a month. Here is a professional photograph of a Mexican bean beetle adult and larva:
Clemson University – USDA Cooperative Extension Slide Series,www.bugwood.org
For preventative control, try planting your bean crop as early as possible. The Mexican bean beetle likes the very warm temperatures of summer and if you can get a quick maturing bean variety planted early, you may outsmart the pest.
The wasp Pediobius foveolatus is a Mexican bean beetle predator. However, it does not overwinter well here and you would need to purchase these insects – not really worth the investment for a small crop of beans. Adding plants that attract beneficial insects is always a great idea.
Some serious bean gardeners plant a trap crop of beans. Theses are planted to the side of the main garden. When the trap crop beans are under attack, the gardeners destroy those bean plants and the insects. Then the gardeners can put in their main bean crop hoping they have eliminated the Mexican bean beetles in their area.
Other bean enthusiasts use floating row covers so the flying beetle can’t get to the crop. For this to work make sure you don’t have garden debris left under the row cover so you aren’t just trapping the Mexican bean beetles in with your beans!
Once the plants have been seriously infected you can think about chemical control. Contact your local UGA Extension agent if things get that bad in your bean patch. For more information North Carolina State has an informative flyer about the Mexican bean beetle.
Wishing you a Mexican bean beetle free year! Happy Gardening!
Late June through early July is a good time to treat for mole crickets in turf.
How do you know if a lawn has mole crickets?
Unfortunately, it is easier to scout for mole cricket injury earlier in the year. Mole crickets themselves are small and very hard to see in June and July.
Mole crickets tunnel underground, killing roots by feeding and tunneling and also come up to eat the leaves. Attacked grass begins to thin and then disappear. The ground will be softened as the soil is pulverized by the tunneling of the crickets. On bare ground you should see the tunnels, especially a day or so after a rain. Golf course managers can watch for the presence of mole crickets by looking for tunnels in sand traps.
Landscapers and home owners may mistake earthworm castings for mole cricket injury. Earthworms leave piles of granulated soil while mole crickets leave tunnels. Even dying grass is not proof you have mole crickets. Look for the small tunnels and thinning grass.
Use a soap drench to drive mole crickets to the surface where you can see them.
Prior to drenching, the soil should be moist. Irrigate 24 hours before drenching if the soil is dry. Mix one-half to one ounce of dishwashing detergent in a gallon of water. Soak the soil well in affected areas. Mole crickets should come to the surface within a few minutes.
Mole crickets have one generation a year. The adults fly, mate and lay eggs March through early June. Eggs generally hatch in May and June.
Mole crickets are generally younger and smaller in late June and July and much easier to kill.
Areas with signs of adult mole cricket activity in April and May are most likely to have nymphs in July.
Not all turf needs to be treated for mole crickets.
Consider treating turf that has a history of mole cricket problems. Athletic fields that keep their lights on during May and June can be at greater risk because the lights attract the adults.
Mole cricket nymphs are small and easy to control in late June and early July. As these insects get larger they will require more chemical and more applications for control. Later chemical treatments may be less effective giving a lower kill rate. As the mole crickets get larger, they also do more damage to turf.
When using insecticides, you can increase control of mole crickets by allowing the soil to dry out for 3 or 4 days and then irrigate thoroughly in the evening. Apply the insecticide the next afternoon. Mole crickets are sensitive to soil moisture and will move down in the ground to find comfortable conditions if the surface is dry. Irrigation will bring them back up to resume feeding the following night, making them easier targets for control.
Remember
Timely treatment is the key to good mole cricket control. Read and follow all label recommendations when using any pesticide.
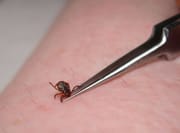
Use tweezers to remove ticks. Pinch the tick close to the mouthparts to remove as much as possible. If the tick head is left behind, don’t worry. Having a tick attach itself to your skin is like having a thorn. Your body will expel it over time. Image credit: Nancy Hinkle.
Ticks are in every part of Georgia. The most common ticks in Georgia are lone star ticks, carriers of uncommon diseases called “ehrlichiosis.” However, the American dog tick is also present in the state, and it is known to carry Rocky Mountain spotted fever—a flu-like illness that can cause complications for young children and those with suppressed immune systems.
The best course of action to prevent disease is to avoid tick bites altogether, said Nancy Hinkle, a UGA Extension veterinary entomologist.
She advocates:
Wear long pants tucked into your socks or boots when walking or working in heavy brush. “It does look dorky, but it’s the most effective way to protect yourself from ticks,” she said. “The ticks have to crawl all the way up your boot and up your pants leg before they get to you, and that’s more of a chance for them to fall off or for you to find them before they attach.”
Bug repellents that contain DEET to repel mosquitoes will work somewhat, but they are far from bulletproof.
Repellents containing the pyrethroid, permethrin, work best to repel ticks, Hinkle said. The key is to apply it to clothes early and to let it dry completely before an outing. The permethrin will stay on clothes through multiple washes, but the solvent can also deteriorate plastic and some synthetic fibers.
If you find that you’re picking up ticks in a yard, it may be time to mow the grass and trim the hedges. Keeping things tidy will help knock down tick populations or at least convince them to move.
Even if you’re diligent with your permethrin and you tuck your pant legs all the way into your boots, it’s important to check yourself for ticks when you get home.
For parents, Hinkle recommends a once-a-day tick check for kids if they’ve been playing in the woods or near the woods. If you find a tick within 24 hours of it attaching itself, there is little chance of it transmitting anything that could hurt you, Hinkle said.
That being said, sometimes they are tricky to remove. The best method is use tweezers or your fingers to grasp the tick as close to the skin as possible and pull. Be careful not to squeeze the body of the tick during the process because that can empty the tick’s stomach contents into your bloodstream, Hinkle said.
“Fortunately the old, urban myth about not removing the mouthparts is meaningless,” Hinkle said. “If portions of the mouthparts are left behind, the body will eventually work them out—just as when we get a thorn or splinter under our skin.”
Tick bites will cause an itchy, sometimes-raised spot to appear after the tick is removed. These can be uncomfortable, Hinkle said, but that’s normal.
“The (lone star tick) is the most common tick in Georgia, and it is also the tick that makes us itch the most,” she said. “When I get a lone star tick attached to me, I’ll itch for four or five weeks, with a pruritic, indurated lesion (an itchy, hard sore) at the bite site.” “Unfortunately there’s not much we can do about the itch, other than anti-itch creams; it’s our immune system’s way of removing the tick’s salivary secretions over time.”
The time to watch for symptoms of Rocky Mountain spotted fever is about a week to two weeks after exposure to the tick. If you’ve been exposed to a tick and experience body aches or headaches, a fever, fatigue or have a spotty rash on your hands or feet, you should visit the doctor and tell them about your tick bite. The disease can be cured with antibiotics, but left untreated, it can be dangerous, especially for children under 5 years old, according to the Centers for Disease Control and Prevention (CDC).
For more information on Rocky Mountain spotted fever, visit www.cdc.gov/rmsf. For more information about preventing ticks, see UGA Extension Circular “Protect Yourself From Ticks.”