The Five Step Felling Plan – Step 3 – Plan Your Escape Route

The Five Step Felling Plan - Step 3 - Plan Your Escape Route

You need a safe, clear escape route when felling a tree.

90-15-5 Rule

90% of the accidents during felling occur within 15 seconds after the tree moves and within 5 ft of the trunk. This is called the 90-15-5 rule.

Within the radius of the tree there are two high danger zones and two safer retreat routes. The first and largest high danger zone occupies a half circle from the center of the tree going outward in the direction of the fall. The second high danger zone is a quarter-circle area in the direction opposite the felling direction. You can be hurt in this area if the trunk jumps the stump, sets back, or the tree barber chairs.

Escape Route

Your escape route is in the 45-degree angles between these danger zones. Your retreat distance should be a minimum of 20 feet from the falling tree. Clear away all obstacles – such as debris or brush – that might slow you down or trip you up. You should be able to make your escape without turning your back on the falling tree.

Once you’ve identified your escape path, communicate your plan of work and retreat route to others on the work site. Discuss potential hazards; co-workers may have observed something you missed.

If the escape route is so important, why wait till the third step of the felling plan? The escape route is determined by the direction of tree fall. You will need to determine the height of the tree, identify hazards, measure lean, and assess your available equipment before you can fully determine the felling direction. If you change the felling direction for any reason, you need a new escape route.

This guy knows how to clean up his escape route.

The Five Step Felling Plan – Step 2 – Gather Your Equipment

The Five Step Felling Plan - Step 2 - Gather Your Equipment

Safety isn’t just a slogan, it’s a way of life.

First and foremost, make sure you have your PPE on. Starting at the top, a helmet, safety glasses, ear protection, gloves, chainsaw pants or chaps, and finally, boots, preferably with steel toes.

Now determine what equipment is needed to assist the tree in its intended path of fall.

You will need a well-maintained and properly running chainsaw that has an engine which can safely operate a bar length slightly longer than the diameter of the tree. The chain should be sharp and in good repair.

If the tree has back or side lean, a throw line and rope or mechanical advantage set may be needed to help pull the tree over.

Wedges are required equipment on-site any time a tree is being felled. You may need multiple wedges and an axe to drive them. Wedges are a great way to provide mechanical advantage to a tree.

It is a good practice to place a wedge in the back cut of any tree being felled, regardless of the direction of lean.

Move all the equipment you have determined you will need to the base of the trunk. If you don’t have all the equipment you need, then walk away and save the job for another day when you do have the equipment.

Help Fight Crime

If you are a landscape professional, know a landscape professional or employee a landscape company who has been a victim of theft, please share this with them.

These crimes are escalating – a local company was shot at and robbed at gunpoint. The Georgia Urban Ag Council is tracking these crimes to give data to local law enforcement. Email mkw@georgiauac.com or call 1-800-687-6949. Please help spread the word.

The Five Step Felling Plan – Step 1 – Heights, Hazards, and Lean

The Five Step Felling Plan - Step 1 - Heights, Hazards, and Lean

Safety isn’t a word, it’s an action plan.

Before you drop a tree, you need a plan. The Five Step Felling Plan can save your life.

The first step of the Felling Plan is called heights, hazards, and lean. You cannot drop a tree safely with out determining the height, assessing the tree and area for hazards, and measuring lean.

How tall is the tree?

There are many ways to determine the height of a tree. There are cell phone apps that can help you, and tools such as a clinometer or transit. The technique demonstrated here relies on free equipment almost always available at your work site: a stick!

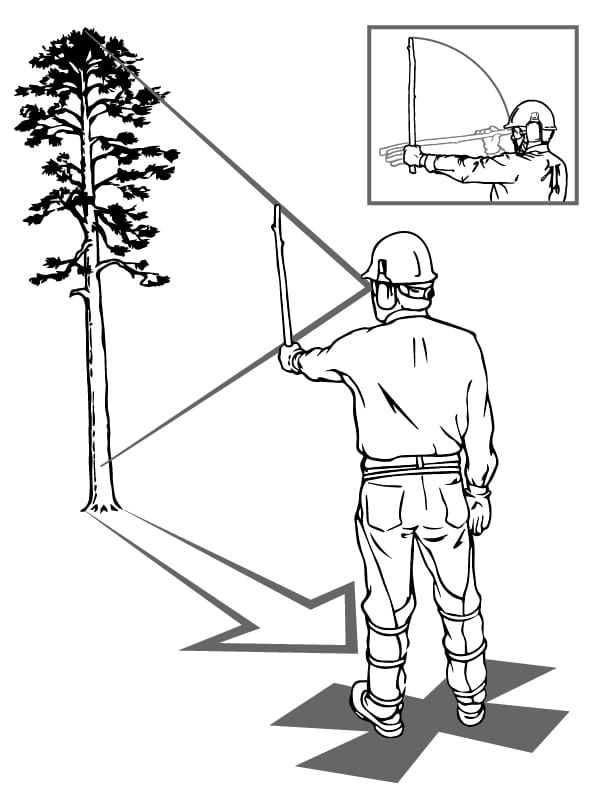
The stick trick for measuring tree height is easy and fairly accurate. You need to find a stick as long as the distance between your hand, when your arm is outstretched, and your eye. (Measure with your safety glasses on! Don’t poke out your eye!) Break off the stick or just hold it in your hand at that length.

  • Line your hand up with the spot on the tree where you will cut the notch.
  • Rotate the stick 90 degrees without moving your head or dropping your arm.
  • Then walk backwards, away from the tree, until the tip of the stick is even with the top of the tree.
  • It is important to hold your hand and arm still and to move your eyes, and not your head when you are lining up the tree.

When the tip of the stick lines up with the tip of the tree, you should be standing where the tip of the tree will fall.

The height estimate must be adjusted for front and back lean and topography. If the tree leans forward the height will be over estimated and if it has back lean, this method will underestimate the height. Similarly if the tree is on a slope falling up hill the height estimate will be low and if it is falling downhill the height will be overestimated.

What are the hazards?

Some sites are loaded with hazards!
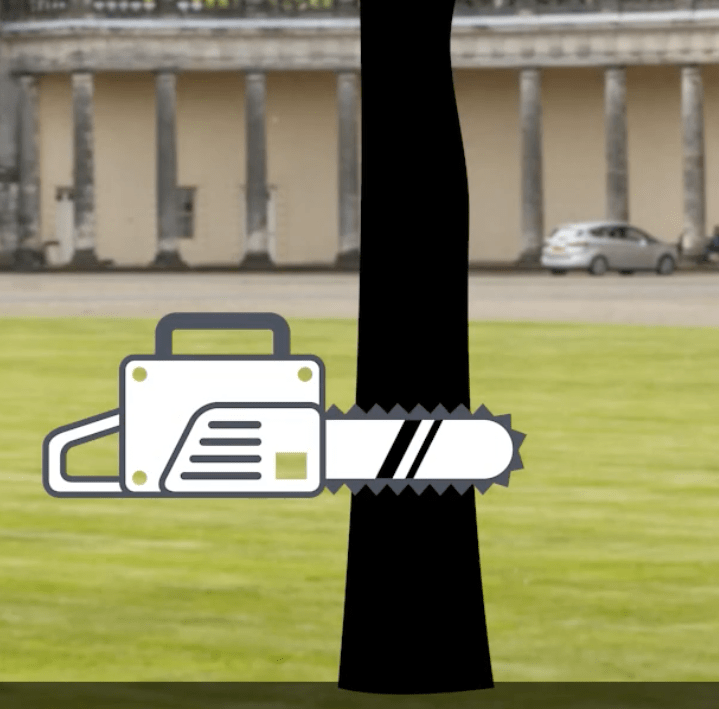
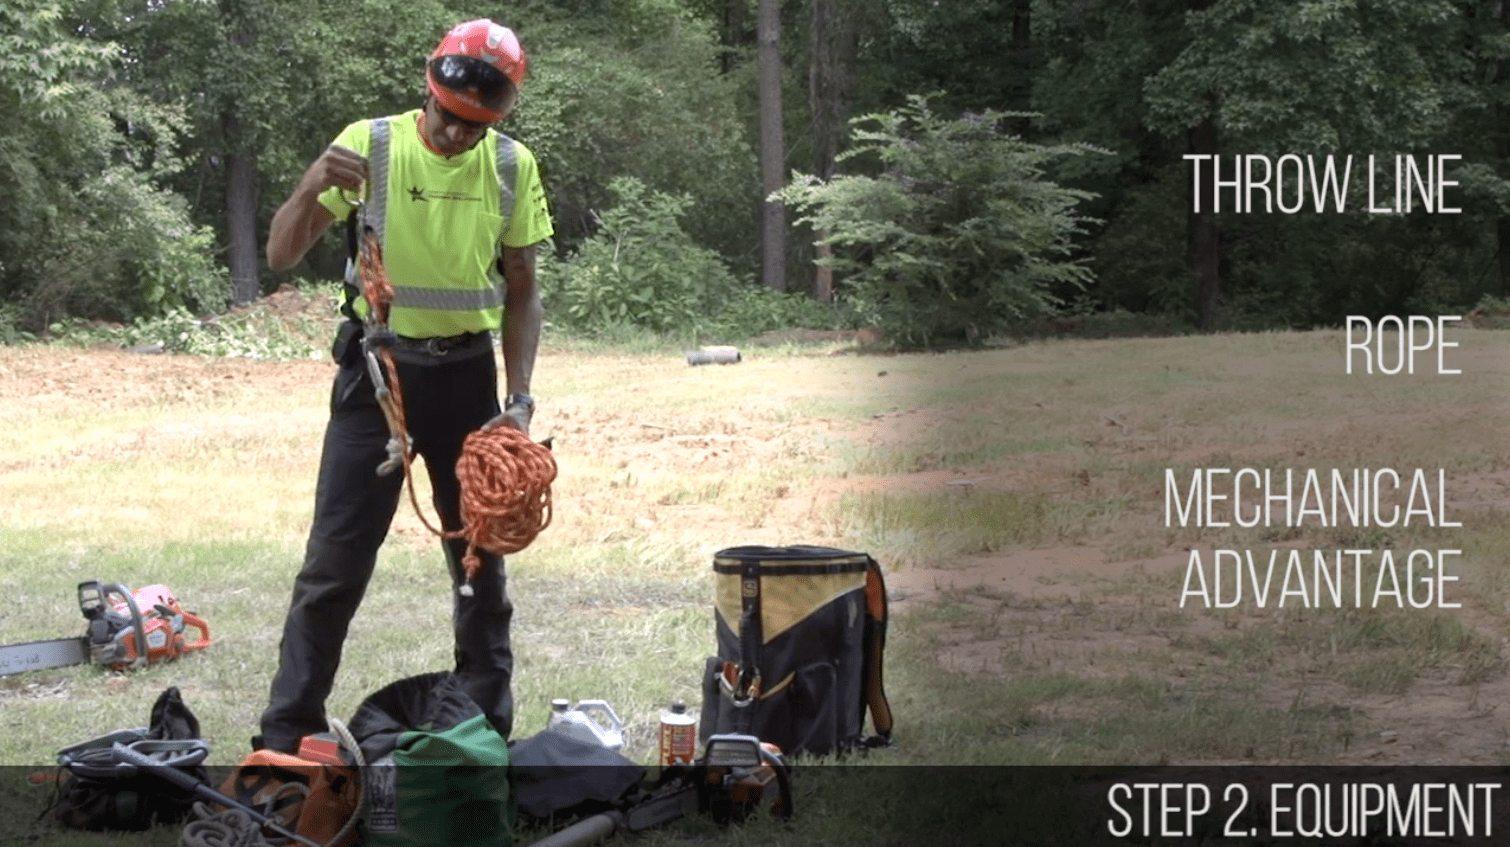
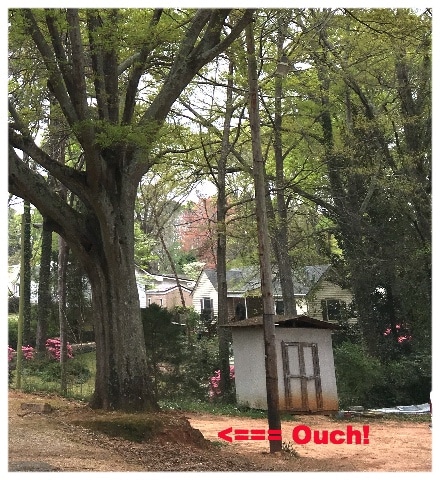
Next, it is time to look for hazards. Take a walk around the tree and look at it very carefully. There are many potential hazards. Anything the tree may hit on the way down is also a hazard. Buildings, fountains, electrical wires, people, wildlife, and cars are just a few of the hazards that must be avoided.

Another tree which can change the direction of the fall or hangup the tree you want to fell is a potential hazard.


Some sites are loaded with hazards!

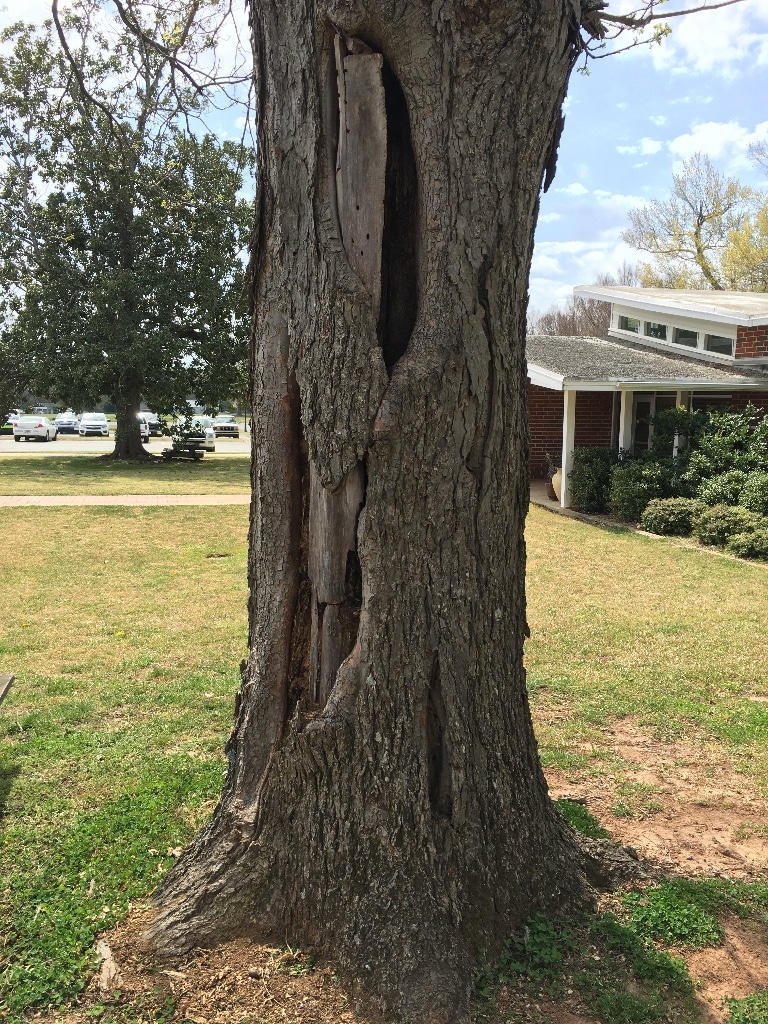
We talked about hazards found on the tree itself in the previous newsletter, but I have to remind you to take a good look at the tree as well.

Does the tree lean?

Does the tree lean?There is an easy way to tell if a tree has lean. Make a circle by placing your index fingers and thumbs together. Peer through the circle and step back until you have most of the tree’s canopy in the circle. Drop an imaginary line from your index fingers and thumbs to the ground. How far is that line from the base of the tree? In this case it is 4 feet.


Lean needs to be measured at two separate locations. First measure lean in the line along which you intend to drop the tree. Then, move 90 degrees perpendicular to that and measure lean.

Generally if the tree has 3 feet or less of side lean, the notch may be adjusted to compensate. If it has more than 3 feet of side lean the tree will not fall in its intended path and you must come up with a new plan.

If you decide to adjust the line in which the tree will be felled, re-assess the lean again in the new line of fall and again, 90 degrees perpendicular to it.

When you finish this first step, you should have identified an intended path of fall.

We usually end with a video, but there are so many on YouTube in which cutters failed to assess Height, Hazards, and Lean that it is pointless to select one here.

Site Assessment: The Tree

Take a Good Look at the Tree

Take a Good Look at the Tree

Safety isn’t just a slogan, it’s a way of life.


Before you cut or climb a tree, take time to assess the tree for hazards. Put your hard hat on and take a good look at the tree. Some tree dangers are readily visible, but others can be hiding inside the tree. Danger signs may be subtle, so make a thoughtful inspection of the tree from the ground on up to the top of the crown or canopy.

Inspect the Tree

Make sure you can see the tree clearly.

Pull all the leaf litter and/or mulch away from the base and the root flares. Then remove all vines from the area and the trunk so you can do a clear, visual examination.

Inspect the tree for weaknesses at the base. These are signs and symptoms of root collar decay:

  • Loose and dead bark
  • Conks or mushrooms
  • Crack in the lower trunk
  • Sap flow from lower trunk
  • Abnormal root flares, diminished, or loss of root flares.
  • Soil mounding or grade changes
  • Cracks in the soil from ground heaving

Look for cracks, cankers and cavities in the trunk. Strike the base of the tree with a rubber mallet. If this produces a dull sound, the tree is rotten.

Look up into the canopy and among the limbs. Look for fungi on branches and identify dead, broken and/or lodged branches. These are potential falling hazards known as “widow-makers.”

Beware of the Resident Wildlife

Cavities may host more than rot: They may also be nesting sites for wildlife, including slumbering bats, defensive birds, and stinging insects. Noise, droppings, stains on the bark, and insect or animal activity are indications that some critter calls the tree cavity home. Squirrels, birds, and bats may roost in limbs, as well.

Consider the Tree’s Environment

Environmental conditions and surrounding trees should be considered. In wet conditions, saturated soil can lead to root destabilization and trees prone to uprooting. Root pruning caused by construction can increase the chances a tree will fall. Removal of surrounding trees that exposes trees to strong winds can also weaken trees. Check out the video below.


Eerie Footage of Earth Breathing in Nova Scotia 2015

Have you seen this earth breathing video? It is all over the internet and there are many silly explanations offered. This one has it right.

Cool Cut: The Stump Cut

Safety isn’t just a slogan, it’s a way of life.

Warren Williams of North American Training Solutions demonstrates a cool cut below. This stump cut can come in handy when one of your clients wants you to make a plant stand out of the tree stump or just wants the stump cut low.

After the initial starting cut, the cut is made with the top of the saw. Keep the tip of the saw in the tree. The saw tosses the chips into the cut (pictured above) and the cookie floats on the chips. As a result, the saw doesn’t get pinched. A very large cookie from a large tree floating on theses chips can easily be pushed off the stump.

This is not a cut that should ever be used to take down a tree, but it can come in handy at cleanup.

Flower Pot Cut or Impress Your Stump Grinder

Warren Williams of North American Training Solutions demonstrates this cut.

Three More Critical Saw Safety Features

Three More Critical Saw Safety Features

Safety first…because accidents last.

The throttle interlock trigger prevents the throttle from engaging accidentally. If the interlock is not depressed, the throttle cannot engage. The feller must have his left hand firmly on the handle to depress the interlock and trigger at the same time. The throttle interlock prevents the chain from being driven if the trigger is accidentally engaged.

The broad bottom of the handle and the chain catch work together to protect you if the chain breaks. Turn the saw over and take a look at the chain catch. These break off and get lost occasionally. They can be purchased at the saw shop and easily replaced.

If the throttle interlock is not functioning properly, the handle is damaged, or the chain catch is missing, the saw should be immediately locked out of service and tagged for repair. Take the bar off so nobody grabs the saw and loads it up.

Inertia Chain Brake

Inertia Chain Brake

Avoid the worst. Put safety first.

The inertia chain brake is a very important safety feature of the modern chain saw. It improves the safe use of the chainsaw in 3 separate ways:

  1. It acts as a hand guard protecting your left hand from being slapped and stabbed by tree branches while limbing, bucking, and clearing.
  2. When activated between cuts it can prevent you from getting accidentally cut while walking. If you were to slip or trip while traveling between cuts, natural reaction could cause you to squeeze the trigger, potentially cutting yourself in a variety of gruesome ways. ANSI and OSHA standards recommend taking no more than 3 steps without engaging the chain brake. Glen Peroni of North American Training Solutions suggests activating the brake when you take even one step.
  3. In the event of sudden or rapid movement of the chainsaw, such as when kickback occurs, the brake is designed to engage automatically through the force of inertia. Since kickback occurs suddenly and with great force most people cannot react fast enough to activate the chain brake manually. Chainsaw manufacturers spent a lot of time and money researching a way to help us. The chainsaw brake handle, brake spring, and band are designed to be of the perfect weight and tension to activate at kickback by the rapid movement of the saw. It is similar to a seat belt in a car; it works when you need it.

Test this safety feature on your saw.

Set a piece of wood or log on the ground. Hold the saw in front, at approximately shoulder level, with the brake disengaged. Then simply let the saw fall onto the piece of wood. The chain brake should activate. If after 3 tries it does not activate the chainsaw should be taken out of service until the brake can be fixed. Normally this means it needs a good cleaning.

What is the best way to lockout-tagout a saw?

Take the bar off. That way nobody is likely to put it on a truck and take it out.

Kickback Demonstration by Chainsaw Instructor Joe Glenn

Joe demonstrates kickback here and you can see the chain brake activates on the third demo.

Always Remember to Use Your Chain Brake

This is one of Peroni’s incredible saw sound imitations. You can hear the clicking on and off of the chain brake. How many steps does he take while limbing this tree?

Mechanical Advantage with Ropes and Knots

Mechanical Advantage with Ropes and Knots

Carefulness costs you nothing. Carelessness may cost you your life.

When applying mechanical advantage (MA), the rope and knots are as important as the pulleys.

You will need more rope to make more force. For example, a 5:1 mechanical advantage will need five feet of line for every one foot gained.

Anytime a knot is tied in a rope, the rope is weakened. In drop tests and pull tests, a rope typically breaks at the knot. Attaching the pulleys to the pull line with midline knots reduces strength. A better option is to use a separate Prusik cord or a hitch such as the Valdotain Tresse Knot (VT). This retains rope strength while allowing adjustment. Phillip Kelley will show you how to do a modified VT in the video below.

In MA systems, there should be some form of control in case the pulleys meet and become two-blocked. The load must to be held in place until a new pull can be made. Attaching the pulleys with a Prusik cord will hold the load while attaching the other end of the MA system using a separate rope and tying a VT allows for one pulley to be slid away from the other. The video below demonstrates this.

Valdotain Tresse Knot for Climbing and Rigging

Phillip Kelley of North American Training Solutions demonstrate a fast, easy VT that you can use to tie on to the pull line.

This great little video demonstrates how the VT and Prusik knots can be used to correct two-block.

Mechanical Advantage

Mechanical Advantage

Carefulness costs you nothing. Carelessness may cost you your life.

Mechanical advantage (MA) can turn a strong man into a superman. Better yet, you can control the force, getting just as much as you need. This is not the case when pulling with a skid steer or truck. Skids and trucks can quickly generate forces that break trees and gear. Human power, amplified by MA can provide the control needed to do your job safely.

Pulleys with multiple sheaves (wheels) will allow the production of more force. The bell-shaped Prusik minding pulley is the workhorse for lifting, hauling, and tensioning heavy loads. When combined with a Prusik knot they allow the rope to pass when it is pulled and to grab when it is released.

Most people can pull their own body weight. A 200 pound worker named Joe can pull 200 pounds. With pulleys, he can increase that.

To determine the amount of force applied in a simple system, count the ropes at the moving pulley.

In this figure, the worker has a 3:1 MA. There are 3 ropes pulling at the moving pulley. The fourth rope (in the hand) is a redirect because it is not attached to the moving pulley. This system would allow Joe to pull about 600 pounds.

Add one pulley and create 5:1 MA. There are 5 ropes on the moving pulley. Now Joe is pulling roughly 1000 pounds.

What would Joe be pulling with this rigging?

You got it! 800 pounds.

This is a short and very helpful video from ISA about MA.