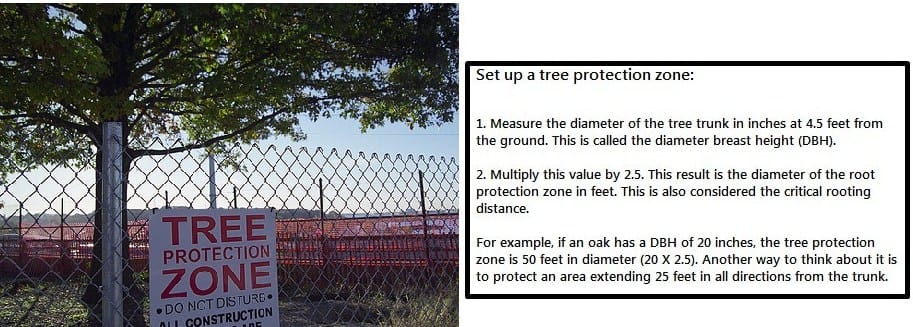
Source(s): Todd Hurt
This handout helps to simplify the decision to hire an external or internal pest scout for ornamental production and tips on problem solving. Used on the GGIA nursery tour 2005.
Diagnosing Plant Problems:
- Don’t Jump to conclusions
- Plant Pathologist/Entomologist
- Start Big then Work Small
- Plant Problems are rarely the result of a single factor
Terms to know
- Signs
- Symptoms
- Pathogenic
- Abiotic
- Halo
Basic Questions
- What plants are being effected?
- How many plants are involved?
- Is the damage found on all of the plants or is it localized?
- Is the damage even or progressive?
- How long have they been planted?
- How are they being watered?
- When did you first notice the problem?
- Has it spread?
- Have you applied anything to try to solve the problem?
- Foliar Burn? Also ask about other recent work (i.e. painting, pressure washing)
Now Focus on the Individual Plant:
- Are the symptoms on one side of the plant?
- Inside of the canopy or out on the tips?
- Lower leaves or new growth?
- Entire Plant – suspect chemical damage, root/water problems, soil borne diseases
- Check Planting Depth
- Observe Root System
- Damage at soil line or trunk
Insects and Diseases
- Soft Bodied Insects note color then preserve in rubbing alcohol
- Disease sample in active margin (halo)
- Take a large enough sample to show progression
- In turf note size and shape of damaged area.
- Keep sample cool in a ziplock bag. Do not add water.
- If root disease is suspected sample in separate bag.
Bacterial Disease Symptoms
- Leaf Spots (often water soaked)
- Wilts
- Galls
Viral Disease Symptoms
- Mosaics
- Ring spots
- Wilts
- Stunting
- Leaf curling
Integrated Pest Management(IPM)
The practice of using all suitable techniques and methods in as compatible a manner as possible to maintain pest populations at levels below those causing economic injury.
IPM Knowledge
- Know Plants
- Know Culture & Management Practices
- Know Pests
- Know Control Options
- Know County Agents, Resources
- Know Chemical Representatives
- Know Strengths &Weaknesses
The Scout Decision? Internal v/s External
Internal
- Familiar with the nursery
- Familiar with normal plant appearance
- Already on the payroll
- No risk of pest entry from other nurseries
- Confidential
- Risk of being redirected to other nursery work
- Limited time for scouting skill acquisition
External
- Salary expended only for scouting time
- Can specialize in scouting, achieve higher skill level
- Broader diagnostic network
- Risk of pests entry from other scout’s nurseries
- Potential loss of confidentiality
Scout Tool Box
- Cooler or Ice Chest
- Hand lens
- Plastic Bags
- Water Proof Marker
- Clipboard White paper
- Portable pH/EC test
- Sample Vials & alcohol
- Reference books
- Water
- Knife
- Clippers
- Folding Saw
- Flagging Tape
- Ruler
- Gloves
- Camera
- Paper Towel/ Wipes
Routine Scouting For Container Nurseries
Scouting Efficiently
- Monitor Long Cycle Crops Weekly to Biweekly
- Spend approximately 10 mins inspecting 20 or more plants for every 1000 sq. ft. (or block)
- Include time to observe pest control application and monitor for efficacy
Tips for Scouts
- Enter each block looking for abnormal plant symptoms
- Lift a few suspect plants out of the pot (check moisture level and for decaying roots)
- Examine foliage for trouble, both new and old growth and top and bottom surfaces.
- Determine rough count of plants per block with symptoms
- Look for problem areas (I.e. weeds, irrigation problems or plant spacing)
- Do the symptoms form a pattern?
- Flag problem areas (remember however the flagged areas may receive extra attention by the applicator)
- Record Number and stage of pests present and any beneficial insects present.
- Determine Threshold numbers
Situational Scouting
- Nursery Design
- Nursery Maintenance
- Water Source and Quality
- Nursery Media
- Nursery Containers and Storage
- Fertilization
- Plant Propagation
- Plant Production
Web Resources:
- Cherokee County Extension Service http://cescherokee.org
- Georgia Center for Urban Agriculture http://gaurbanag.org
- Univ. of Florida Commercial Nursery Scouting Manual http://mrec.ifas.ufl.edu/lso/SCOUT/INTRO.htm
- Integrated Pest Management for Floriculture and Nurseries (ANR Publication 3402) was produced under the auspices of the UC Statewide Integrated Pest Management Project. It is priced at $45 a copy plus tax and shipping with discounts available for purchases of 10 or more copies. The new guide is available at local UC Cooperative Extension offices, directly from ANR Communication Services (6701 San Pablo Avenue, 2nd Floor, Oakland, CA 94608-1239), or by phone (800-994-8849), fax (510- 643-5470), and online at http://anrcatalog.ucdavis.edu.
- UGA Pest Control Guide http://pubs.caes.uga.edu/caespubs/PM-Handbook.htm
- Chemical Labels http://www.cdms.net/
- Koppert Biologicals Side Effects Database http://www.koppert.nl/e0110.html
- UGA Plant Disease Library http://www.plant.uga.edu/Extension/plantlib.htm
- Featured Creatures (Insects) http://creatures.ifas.ufl.edu/
- Weed Id (Virginia Tech) http://www.ppws.vt.edu/weedindex.htm
Resource(s): Insect Pests of Ornamental Plants
Center Publication Number: 115