Saddleback Caterpillars: Watch Out for that Sting

Source(s): Randy Drinkard

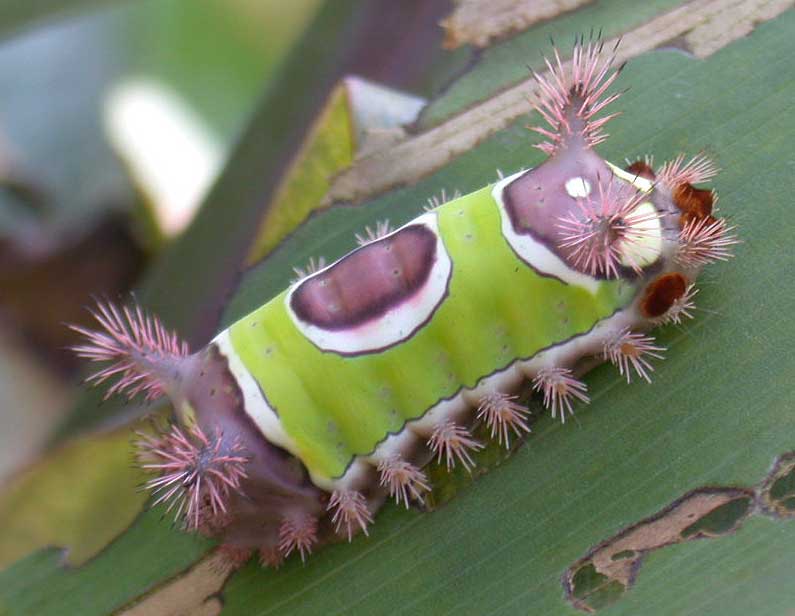
Over the past several weeks I have been contacted by several community gardeners who have discovered saddleback caterpillars by feeling their painful sting. I was stung by one years ago while harvesting okra. It literally knocked me to the ground. To avoid more gardening mishaps with these creatures I want to share this article written by Randy Drinkard. Stay safe out there gardeners!


Most people know that bees, wasps, hornets and some ants can sting to defend themselves or their nests. Only a few people realize, usually from first hand experience, that handling some caterpillars can produce some painful results. Recognizing the few stinging caterpillar species, including the saddleback, may prevent irritating encounters.

Saddleback Caterpillar

Saddleback Caterpillar Description

The saddleback caterpillar measures about an inch long, and has poisonous spines on four large projections (tubercles) and many smaller ones projecting from the sides of its body. The “saddle” consists of an oval purplish-brown spot in the middle of a green patch on the back.

The saddleback caterpillar is a general feeder and is generally found on many hosts including corn foliage, apple, pear, cherry, rose, Pawpaw, basswood, chestnut, oak, plum and other trees in late summer.

Diagnosing and Treating Stings

Diagnosis is usually simple since a rash generally breaks out where the hairs or spines have made skin contact. Contacting the hollow poisonous hairs or spines (connected to underlying poison glands) causes a burning sensation and inflammation that can be as painful as a bee sting. The irritation can last for a day or two and may be accompanied by nausea during the first few hours. Usually the site of contact reddens and swells much like a bee sting.

Immediate application and repeated stripping with adhesive or transparent tape over the sting site may be helpful in removing broken hairs or spines. Washing the affected skin area thoroughly with soap and water may help remove irritating venom. Prompt application of an ice pack and a baking soda poultice should help reduce pain and swelling. Household analgesics, such as aspirin, appear to be ineffective for reducing pain and headache. However, oral administration of antihistamines may help relieve itching and burning. Topical corticosteriods may reduce the intensity of inflammatory reaction. Desoximetasone gel applied twice daily to affected areas may also help. Prompt referral to and treatment by a physician should be made when severe reactions are evident. Very young, aged or unhealthy persons are more likely to suffer severe reaction symptoms.

Sting Prevention

Occasionally, these stinging hair caterpillars may drop out of trees onto people, crawl into clothing on the ground, occur on outdoor furniture or sting when brushed against on plant foliage. Be careful when attempting to brush them off. Never swat or crush by hand. Remove them carefully and slowly with a stick or other object.

Individuals, especially children, should be cautioned about handling or playing with any colorful, hairy-like, fuzzy caterpillars since it is sometimes difficult to distinguish between harmless and venomous insect larvae. Never handpick these hairy, fuzzy or spiny caterpillars except with heavy leather gloves if necessary. Wear long sleeve shirts, trousers and gloves when harvesting sweet corn or working in the landscape in late-summer and early-autumn to reduce possible stings.

Chemical Control

Usually, these stinging hair caterpillars do not occur in sufficient numbers to warrant the use of pesticide sprays. Should potential hazards exist around residences or schools, infested shrubs and trees may be sprayed to reduce or eliminate these caterpillars. Sprays of carbaryl (Sevin), or Bacillus thuringiensis (Biotrol WP, Sok-bt, or Thuricide) as well as various pyrethroids (bifenthrin, cyfluthrin, cypermethrin, deltamethrin, lambda-cyhalothin, permethrin and tralomethrin) in formulations labeled for bushes, shrubs and trees, can be helpful, if practical. Be sure to read the label, follow directions and safety precautions.


Resource(s):

Insect Pests of Ornamental Plants

Center Publication Number: 200

Hanging Baskets

Source(s): Randy Drinkard


basketHanging baskets are an attractive and practical way to add color, interest and beauty to outside areas, such as patios, decks and terraces. And since they can be used inside, hanging baskets are becoming extremely popular! In the old days, hanging baskets contained only one type of plant. But in recent years, mixed baskets have become very popular. This “instant garden” look appeals to beginning gardeners and longtime hobbyists alike.

Plastic hanging baskets are inexpensive. But you may want to use moss and coco fiber to get that “organic” look. Plants in moss and coco baskets can dry out fast, though. You may need to water often, especially if the plants are large and in a drafty place. If you’re making your own moss or coco basket, insert a piece of plastic with holes in it for drainage. This will allow water to stay longer in the container. To retain a natural effect while helping hold moisture, you can put black plastic liner inside the moss liner and poke holes in it.

Often called “potting soil,” the best potting mix doesn’t contain any soil. Regular topsoil usually doesn’t have the qualities necessary to support good plant growth in containers, and it may contain diseases and weed seeds. A good potting or soilless mix is well-drained and aerated and holds moisture and nutrients well. Such mixes may contain peat, bark, perlite and vermiculite in various proportions. The pH of the mix, that is, how acidic or alkaline it is directly affects the plant’s ability to take up nutrients. Make sure you choose a mix in the 5.5 to 6.5 pH range.

Windy sites aren’t good for hanging baskets. The wind causes them to dry out fast and need frequent watering. This can stress your plants and cause them to perform poorly. For places that get 4 to 12 hours of sunlight per day, select plants for full sun to partial shade. For those that get 2 to 4 hours of early or late sunlight per day, select plants for partial to full shade.

Remember this rule: All plants combined in one basket must have similar water, light and nutrition requirements. When you plant a hanging basket, fill the basket with potting mix to within a few inches of the rim. If your mix doesn’t contain nutrients, mix in some slow-release fertilizer. Be sure to follow label rates for the size container you’re using. If you’re mixing in a water-retaining agent, mix it with the media before you plant.

Select healthy, high-quality plants. Inspect the foliage and flowers for any signs of pests or diseases. Take the plant from the pot and examine the root system, which should be white and well-developed. Avoid root-bound plants. Some examples of trailing plants that are beautiful in hanging baskets are petunias, million bells, geraniums, Bacopa, torenias, verbenas, portulacas, helichrysums, English ivy, German ivy, potato vines, scaevolas, Bidens, angel wing begonias and Vinca vines.

To keep your hanging plants growing and flowering, you have to supply plenty of water and nutrition all season. When plants are small, their water and nutrition needs are less. As the weather warms and plants grow, though, their water and nutrition requirements increase. Container-grown plants need fertilizing about once every other week. When using a liquid plant food, make sure the potting mix is moist. If it’s dry, the fertilizer salts could damage the plant roots.

Regular deadheading (removing spent flowers) encourages new flowers to develop. Pruning and trimming stimulates new growth. Scout thoroughly and often for pests and diseases. Look closely at the flowers and foliage for pests and damaged, deformed or discolored leaves or flowers. You may have to part the foliage to examine the center of the plants closely. Don’t stress your plants by not properly watering or fertilizing them. A stressed plant is more prone to diseases and pests. Planting healthy, high-quality plants is a good start, but to keep them robust and attractive, you also will need to provide the best growing conditions.


Center Publication Number: 86

Houseplant Help

Source(s): Randy Drinkard


Beautiful houseplants can add color and charm to any household. But providing the optimum growing conditions can often be a challenge for even the best of gardeners.

Low light, low humidity, dry air and too much soil moisture are the primary culprits that can weaken and destroy our indoor plants. Proper management of these growing factors, of course, is essential to your maintaining healthy, vigorous houseplants. How then, you may ask, do I know what to do to correct the problem before it is too late? That is a good question, but even inexperienced growers can look for certain danger signs that plants show when they are under stress. You can then usually tell what you are doing wrong and take corrective action to revive your plants.8083487753_02e9df65e0_o

Listed below are the eight most common symptoms expressed by ‘sick’ plants and help tips.

  1. Stems grow abnormally long; leaves become long and pale and new leaves are undersized; growth is weak or spindly: This is almost always due to insufficient light. Give your plants more light by placing them closer to a window or supply supplemental lighting via grow lights.
  2. Stems become soft or mushy, dark in color and rotten; lower leaves curl and wilt; soil at the top of the pot is constantly wet: Too much water is the cause. Do not water as frequently or water when the soil is dry to the touch approximately one to two inches below the surface. Sometimes the soil surface may be dry but the root zone may be saturated. Continuing to water plants that are growing in over-saturated soils will inevitably lead to root rot. Make sure that your pot’s drainage hole is not clogged and don’t let your plants sit in water-filled saucers for more than an hour.8083486437_069a407926_b
  3. Wilted foliage: This can actually be caused by underwatering or overwatering. Also, excessive amounts of fertilizers can draw water from the roots, causing the plant to wilt. If the plant has a root or stem disease, this will prevent water uptake, causing the plant to wilt. Other causes of wilting are low humidity, moving shock, a sudden change in light or temperature, cold or hot drafts, high heat or frost damage.
  4. Defoliation: Rapid defoliation may be caused by extremes in temperature, changes in light, overwatering or underwatering and exposure to cold and disease. Gradual defoliation, as when the lower leaves turn yellow and drop, can be caused by over watering(root rot), underwatering, lack of sufficient light, low fertility or disease. Keep in mind that an occasional leaf may drop due to natural aging. . .which is normal.
  5. Leaves yellowed, wilted and/or mottled: This is often caused by too much water which in turn causes root rot. As mentioned earlier, do not let your plants stand in water. Yellowing may also be caused by severe insect infestations(scale or spidermites),

    very low light, high temperatures or insufficient amounts of plant fertilizer. [Older plants may become pot-bound and a yellowed or wilted condition usually develops. In this case, repot to a larger container using fresh potting soil].

  6. Browning of leaf tips: Low humidity, excess fertilizer, water that is high in fluorine, spray damage from pesticides, unfavorable soil reaction(a high or low soil pH), air pollutants or root loss due to excessive water in the soil will cause tips to brown. Water that contains fluorine should be allowed to sit for several days before using so that the fluorine may bubble out. Simply trim away any brown tips with sharp scissors to improve the looks of your houseplants.
  7. Leaf edges are crinkly and brown: This is caused by low humidity. Increase humidity by grouping plants or by placing them on a bed of moistened pebbles in a tray. Misting helps, too. You may also want to consider placing a cool-vapor humidifier in your plant room to increase humidity.
  8. Rot at soil level: This is usually caused by over watering, yet plants that are set too deeply or a fungal or bacterial disease may be the problem. In most cases you will have to discard the plant, although you may be able to start new plants by taking cuttings from upper sections that are healthy.

Center Publication Number: 109

Japanese Beetles

Source(s): Randy Drinkard


It’s June and Japanese beetles are appearing on a number of plants. The damage adult beetles do in a short period of time can wreak havoc on flowers, shrubs and vegetables. Feeding on the upper surface of leaves, they eat the tissue between the veins, leaving a skeletonized appearance to the damaged leaves. Japanese beetles love certain plants with crape myrtles and roses being favorites.japanese

As the name implies, Japanese Beetles are not indigenous to North America. They were accidentally imported from Japan and first appeared in New Jersey in 1916. Despite efforts to contain them, they now infect about half the contiguous 48 states and continue to spread south and west at a rate of 5-10 miles per year. Unfortunately, they will probably be with us for the long haul. The good news is that they can be effectively managed with minimal damage to your landscape.

The adult beetles are generally less that one half inch long. They are metallic green with copper-brown wing covers. Beetles emerge from the ground in early June and feed on more than 300 different plants including herbaceous ornamentals, shrubs, vines, trees, small fruits, fruit trees, row crops, and even poison ivy. They generally live 30-45 days. During that time, females lay 40-60 eggs in the soil. The grubs hatch after 8-14 days and spend 10 months underground, feeding on plant roots and organic matter. Their one-year life cycle comes full circle as the adults emerge the next June.

The most effective means of control is to treat both adult and larval forms. Because the adults are capable of flying in from other areas, controlling one form does not necessarily control the other. Any control measures will be much more effective if all your neighbors control their populations as well.

Adult beetles usually feed in masses and tend to prefer plants in direct sun. Their presence attracts more beetles as they emit pheromones(odors) that attract other beetles to feed and mate. If you catch them early and don’t have too many, hand picking is an effective control. Simply pick or shake off the beetles and drop them in a bucket of soapy water. This is easiest to do in the early morning when the beetles are less active. For larger infestations, spray with Sevin(carbaryl). Be sure to read and follow all label directions. During heavy activity, you will need to spray every 3-7 days. Because Sevin is deadly to bees, try to spray when bees are less active, generally during the hottest part of the day from noon to around 5 pm. When using Sevin on vegetables for insect control, there is a wait period of 3-5 days before crops are safe to harvest and eat. Pheromone traps are not recommended for use in the landscape. They do trap beetles, but in doing so they usually attract many more beetles to your yard and garden than would ordinarily be there.

While we easily see the adult beetles and the damage they do, the larval form can cause extensive damage as well. Larvae are white grubs that are C-shaped when disturbed. White grubs feed primarily on roots of turf grasses but they also attack roots of ornamental trees and shrubs. Heavy infestations can destroy large areas of turf to the extent that the grass can be rolled up like a carpet. You can dig a sample(3 inches deep) to determine their presence. Control measures are warranted if you have more than 10 grubs per square foot of turf area. The most effective time to control grubs is during the late spring(May) or late summer(August) when they are close to the surface of the ground. Applying trichlorfon, imidacloprid(Bayer Advanced) or halofenozide(Grub-B-Gon) to the soil in areas where grubs are active will control them in that specific area.

For organic control, treat the lawn or ground with Bacillus popillae or Milky Spore. Milky spore is the common name for the spores of Bacillus popillae. Bacillus popillae is actually a bacteria that infects Japanese beetle larvae living in the soil and kills them before they develop into adult beetles. Spores build up in the soil over 2-4 years as grubs ingest them and die. Japidemic and Doom are milky spore products.

There are cultural practices that can lower the number of beetles in your landscape. While Japanese Beetles feed on many species of plants, they definitely prefer particular ones. Some that are particularly susceptible to damage include roses, grapes, sassafras, Japanese maple, plum, apple, cherry, peach, crabapple, crape myrtle, rose of sharon, birch, black walnut, willow, asparagus, and virginia creeper. Other plants are very resistant to beetles. To minimize damage in your yard, consider planting a variety of plants that are not attractive to the pests. These include magnolia, redbud, dogwood, red maple, holly, boxwood, hemlock, yew, juniper, spruce, pine, forsythia, clematis, hydrangea, and sweetgum. Remove diseased and damaged fruit from trees and the ground because the odor of this fruit will attract beetles that will then feed on ground fruit and surrounding plants.


Resource(s): Insect Pests of Ornamental Plants

Center Publication Number: 202

Moss Management

Source(s): Randy Drinkard


You may have noticed when cutting your grass recently that what was once your nice, thick, green lawn has turned into a not-so-nice, thick, green something else? What is this “stuff” that is taking over the lawn? And can it be stopped from spreading over your entire yard? Most likely the problem is moss, although in some cases it may be algae.

Moss and algae replace turfgrass when growing conditions for turfgrass are poor and conditions for moss and algae are favorable. Neither moss nor algae are parasitic on turf and they do not kill turf as diseases do.

mossMoss and algae are simply plants looking for a home and if the right conditions are provided, they can quickly take up residence and do well. This is the way nature intended it, so let’s see what created the conditions for these two turf pests to occur in the first place.

Mosses are small plants which produce a mass of fine stems that can survive under very shady conditions. Moss will take over and grow where the shade is so dense during the summer that not enough light is present to support growth of a turfgrass such as fescue. Moss also thrives during periods of high humidity and in water-logged soils like we had earlier this year due to heavy summer rainfall amounts.

Algae is a very simple plant that has no vascular system. It usually forms a dense green mat or scum over the soil surface, although reddish or brownish forms may also occur in some situations. Algae needs plenty of water and lots of sunshine for growth. When the soil dries, algae forms a black crust which becomes hard and relatively water-resistant.

The best solution for either of these problems is the use of a soil aerator that removes plugs of soil from the ground, thus enhancing soil drainage. However, if the affected area has very little grass, it is better to start over. Till the soil to a depth of 6 inches to break up the restrictive layer. Tilling will also facilitate incorporation of lime and fertilizer into the soil. A soil test should be taken to determine plant nutrient needs. Soils with low fertility and low pH (acidic) lead to poor growing conditions for grass and make it easier for algae and moss to become established.

Improving the drainage with the incorporation of organic matter is also beneficial. Low areas that do not drain well should be contoured. In some cases, the use of drain tiles can help remove excess water and improve growing conditions for turfgrasses. Sometimes we may create water problems by watering too much. Irrigation systems should be adjusted to match the soil conditions and plant needs.

Moss can become very thick under heavy shade conditions. Thinning trees or pruning limbs to improve light conditions and increase air circulation is often helpful. If grass won’t grow in these areas it may be necessary to utilize a shade-tolerant ground cover or simply cover the area in mulch.

Some chemicals are available to eliminate moss. Their effect is only temporary and the problem will likely return if conditions do not favor turfgrass growth. Iron sulfate can be applied at the rate according label directions. This product can be purchased at local garden centers and nurseries, farm supply dealers or building supply stores. The only sure method of eliminating moss is to remove it by hand raking.


Center Publication Number: 118

Establishment of Citrus in Georgia

Source(s): Randy Drinkard


Citrus produces fruit best when grown in full sun. Citrus trees planted under live oak trees or pines produce only light fruit crops, but often survive freezes since warmer air may be trapped under the sheltering trees.

Citrus trees do best on well-drained, sandy loam soils, but will grow on many soil types if good water drainage is provided. Citrus plants which develop into trees such as satsumas and tangerines may be planted as close as 10 to 15 feet apart although a spacing of 15 to 20 feet is more ideal. Small citrus plants such as kumquats may be spaced as close as 6 to 10 feet apart, if desired.

Avoid planting trees near septic tanks or drain fields. Tree roots may clog the drain and soaps, borax, etc. used in the home may prove to be toxic to the trees.

Locate citrus plants in a protected area if possible, such as near a home or some other structure, preferably on the south side. This type of location provides maximum protection from severe freezes. Usually the wind associated with south Georgia cold weather comes from the north to northwest.

Rootstock Selection

Selection of rootstock is another factor to be considered when planting and establishing citrus plants. Trifoliate orange(Poncirus trifoliata) is a superior rootstock for satsumas, oranges, kumquats and tangerines and is strongly recommended. It induces good cold hardiness in the scion variety and results in favorable yields and high fruit quality. About the only other rootstocks which are of value are sour orange, Cleopatra mandarin and certain of the citranges (cross of sweet orange and trifoliate orange). The Rusk and Carrizon varieties are two of the more popular. Cleopatra mandarin is an exceptionally outstanding rootstock for mandarin-tangerines. Sour orange is not recommended as a rootstock for kumquats because of incompatibility problems.

Pollination

With the exception of Clementine tangerine and certain tangerine hybrids such as Orlando tangelo, citrus trees are self-fruitful and do not require cross-pollination. The self-fruitful types of citrus may be grown as a single tree.


Resource(s): Citrus Fruits for Southern and Coastal Georgia

Center Publication Number: 175

Sooty Mold

Source(s): Randy Drinkard


Sooty mold frequently develops on the foliage of many ornamental plants in late summer. It covers the top surface of leaves, thus, reducing the photosynthetic process of the leaf.

soot

Biology

Sooty mold is often not noticed until a large number of leaves are covered with a black sooty substance. This is not really a disease, but a black fungal coating on leaves. Sooty mold is an indicator that there is an insect problem on the plant. The insects feeding on the plant are excreting a sugary substance called “honeydew”. The fungus doesn’t feed on plant tissue but on these secretions from the insects that are feeding on the plant.

Various fungi, Capnodium spp., Scorias sp., Fumago sp., associated with specific insects (aphids, scale, whiteflies and other sucking insects) and plants (fig, crape myrtle, azaleas, tuliptree, oleander, osmanthus and other ornamental plants) produce the sooty mold coating. The feeding of a large number of these insects and the coating of the sooty mold may lead to reduced vigor in the plant. These sucking pests take in large amounts of sap. Much of the water and sugars in the sap pass though the insect and onto the leaf. Rain usually will wash this residue off. If there is insufficient rain then the “honeydew” sticks to the leaf.

Control

To control sooty mold first control the aphids, scales or other pests that are creating the honeydew. Aphids can often be washed off by a strong spray of water from the hose. This action may also wash off some of the “honeydew” and sooty mold. Remaining sooty mold will eventually dry up and flake off the leaves. To control heavy infestations of aphids, scale, mealybugs, etc. on ornamental plants, use acephate(Orthene), malathion, imidacloprid or other recommended insecticides.


Resource(s):

Insect Pests of Ornamental Plants

Center Publication Number: 56

Stem Canker of Rose

Source(s): Randy Drinkard


Several fungi are capable of causing stem canker and dieback of roses.

Symptoms:

Cankers begin as spots ranging in color from yellow to purple, depending on the causal fungus. The developing cankers become sunken, forming wrinkled or cracked lesions that are tan to black. Canker margins are brown to reddish purple. Numerous small, black, wart-like specks embedded within the canker area are fruiting bodies of the causal fungus. Cankers often enlarge until the stem is girdled. Once the stem is girdled, the foliage above the canker wilts and dies. Cankers that form at the graft union usually result in plant death.

Disease Cycle:

The fungi causing stem canker and dieback usually survive the winter on diseased canes or plant debris. Spores of the causal fungi are usually spread by wind-blown rain or irrigation water. Rose canes are infected through wounds during periods of humid, wet weather. The disease may also be spread by fungus-contaminated pruning tools. Cankers often form on the stub of pruned canes, but they may also be seen around leaf or thorn scars, winter injury, or other damage on the canes. Stem canker and dieback are most damaging to weak, slow-growing roses.

Control:

When establishing or renovating rose beds, always plant canker-free roses and space the plants to allow for good air circulation. Promote good plant vigor and minimize canker damage by irrigating and by fertilizing according to soil test recommendations. Avoid any unnecessary damage when pruning or handling plants. Make pruning cuts just above the node, leaving a small stub to speed callus formation. Remove cankers by cutting 5 to 6 inches below the canker margin. After each cut, dip pruning tools in 70-percent alcohol or a dilution of 1 part household bleach and 4 parts water. This will prevent the further spread of the disease. Treat roses with Daconil, Immunox, Funginex or other recommended fungicides according to label instructions to provide protection from stem canker and dieback.


Resource(s):

Common Landscape Diseases In Georgia

Center Publication Number: 116

Summer Blooming Shrubs

Source(s): Randy Drinkard


The spring landscape is saturated with flowering shrubs. But spring passes and suddenly it’s summer. All that color doesn’t have to disappear, though. Many plants tolerate Georgia’s heat and humidity while providing lots of summer color.

shrub2

Numerous shrubs are available to Georgia homeowners for providing summer interest in the landscape. Just a few examples of easy-to-grow, summer-blooming shrubs include, althea or Rose of Sharon, bottlebrush buckeye, clethra, chase trees, crape myrtles, hydrangeas, hypericums and spireas.

Hydrangeas welcome the heat of summer to make new growth. The big-leafed hydrangeas produce big, blue, mop-headed flowers that demand attention. The large mounds of foliage support multitudes of flowers, usually mop heads. But occasionally we see a lace-cap plant or two. The flowers are generally blue in our acid soils. But if you lime the soil, the flowers will turn pink or purple.

Two selections are available that keep blooming all summer. ‘Endless Summer’, a new release, and ‘Penny Mac’ keep producing new flowers until frost. Both do best with afternoon shade and a steady supply of moisture.

Our native oakleaf hydrangea forms 6- to 10-foot mounds of foliage from top to bottom. It produces long panicles of white, sterile flowers just above the foliage. These panicles are eight to 12 inches long and fade to a burgundy red as they age. The foliage looks like an enlarged oak leaf. Plants do well in partial shade but require well-drained soils. A great place to plant is on the edge of the woods, where the plants are shaded from the hot afternoon sun.

The peegee hydrangea develops into a large, upright shrub or small tree. The big, white flowers open on new growth in July and August. The selections ‘Tardiva’ and ‘Chantilly Lace’ flower a little later and hold flowers on strong, upright stems. These plants will grow in sun or shade on well-drained soils.

The blue flowers of the chaste tree (Vitex) in July remind us that the flowering season isn’t yet over. The 10- to 12-inch spikes nearly cover the plants. There’s a buzz of excitement, too, as the bees visit each flower. The chaste tree is a fast grower. It reaches 12 to 15 feet tall. The gray-green foliage is usually pest-free. Plants do best in full sun. Flowers develop on new growth, so you need to prune in early spring before growth begins.

Summersweet clethra blooms late, in July and August. This native produces a sweet fragrance that permeates the garden. The spiked clusters of white flowers are 4 to 6 inches long and last three to four weeks. The plants grow 4 to 6 feet tall. They adapt to sun or shade and tolerate heat and drought. The shiny, dark green leaves turn yellow in the fall. Summersweet clethra is a great choice for the shrub border, along lakes and streams or on the edge of the woods.

Be sure to include some flowers and fragrance in your summer landscape. These shrubs make great additions to any landscape. You could even remove an overgrown azalea or two and replace it with some summer excitement to extend your flowering season.


Resource(s):

Landscape Plants for Georgia

Surface Roots in Lawns

Source(s): Randy Drinkard


Much to the dismay of homeowners, trees sometimes develop roots on the soil’s surface. Surface roots can even buckle sidewalks and driveways. Shallow roots growing in lawns not only create unsightly lumps but they may also cause hazardous mowing conditions.

roots

Although trees do send some roots down deep for moisture and stability, most tree roots tend to grow much more shallowly than most people think – usually only 8 to 12 inches deep. Just as the trunk of the tree grows in girth with age, so do the roots. So over time, some of the shallow, older roots of the tree will naturally enlarge to the surface. Sometimes, roots become visible due to erosion of the surface soil.

Once the roots appear on the surface, there is little that can be done to remedy the situation, without substantially damaging the tree. You can prune off the visible roots, but the damage to the cut roots and the fine feeder roots surrounding the area can harm or even kill the tree. Pruning the roots should be confined to situations where the roots are breaking up sidewalks or driveways.

Some homeowners have tried a temporary solution by applying a shallow, 1-inch layer of good-quality soil mix and then replanting the grass. However, it isn’t long before roots will reappear as they continue to grow in girth. A better solution would be to replant the affected surface area with a type of ground-cover plant that will not need mowing.

The best remedy for surface roots is to choose the proper plants for the situation. But if you already have a large, old tree with surface roots that you don’t want to lose, you may just have to learn to accept its intrusion into the lawn.

Other factors may cause roots to develop near the soil’s surface:

  1. Compacted or heavy clay soils. Tight, heavy soils contain very little oxygen; therefore, root growth is restricted largely to the soil’s surface where oxygen is present. To reduce compaction, loosen the soil around the tree’s roots, if possible. If trees are growing in lawns, aerate these areas to relieve soil compaction and increase soil oxygen levels.
  2. Waterlogged soils. Waterlogged soils have very little oxygen available for proper root growth and development. The oxygen that is available is located near the soil’s surface; thus, roots often develop at or near the surface. If soils become waterlogged, reduce watering and improve the drainage; avoid planting young trees in overly-wet locations.
  3. Light or shallow irrigation. Plants growing in or near lawns that are not deeply watered often develop shallow roots near the soils’s surface. Apply enough water to throughly wet the soil to a depth of six to eight inches. In the absence of plentiful rainfall, applying one inch of water weekly to lawns should supply ample moisture to the proper depth.
  4. Natural growth tendency. Some trees and shrubs just naturally develop shallow roots near the soil’s surface. Examples of plants that develop shallow root systems include; alders, elms, figs, honeylocusts, mulberrys, poplars, maples, sycamores and willows. Do not plant these or other shallow- rooted trees in or near lawn areas.

Center Publication Number: 221