Starting A Landscape Business

Source(s): Gary L Wade


Unlike the nursery or greenhouse industry that require a large capital investment to start, a landscape business requires less start-up funds. However, there are certain legal requirements for someone entertaining the business in terms of permits and licenses that must be obtained. These permits and licenses could result in a considerable outlay of money for new firms.

First, a firm must have a business license for the municipality in which the business is based. If a firm is headquartered in one county but does business in five adjoining counties, it may or may not have to have a business license in each of those counties. It is suggested that the landscaper check with the business license office in counties where business is done to determine if a business license is necessary. Some local municipalities have local requirements, while others do not.

Landscape contractors who handle and distribute plant materials must have a Nursery Dealer’s License from the Georgia Department of Agriculture. Also, any plants distributed must be purchased from licensed Nursery Growers and must be free of insects and diseases at the time of installation. If a landscape firm also grows it’s own plant material, it must also have a Nursery Grower’s License. Nursery Growers and Dealer’s Licenses are available from the Georgia Department of Agriculture, Plant Production Division, 19 Martin Luther King Jr. Dr., SW, Atlanta, GA 30334. Phone (404) 651-9486.

A Commercial Pesticide Applicator’s License is required of a person who applies pesticides to the land of another person for hire, or directs the application of pesticides by subordinates. A firm applying pesticides for hire must have a Pesticide Contractor’s License. Both of these licenses can be obtained through the Georgia Department of Agriculture, Phone (404) 656-4958.

If the firm will be installing hardscapes, such as brick walls, decks, etc., a building permit or Contractor’s License is required. Contact the local government for information on permits required.

All irrigation installers are required to have a Low Voltage Electrician’s License before they can install irrigation systems. The license is obtained through the Secretary of State’s office in Atlanta and requires one to pass a written test.

All businesses need to obtain a tax number from the Internal Revenue Service. If a landscaper plans to use part-time workers, temporaries, or subcontractors, the IRS has some rather complicated and specific rules in this area that he must understand and follow.

Speaking of liability, firms doing the work on the properties of others must have liability insurance. Generally, liability insurance rates increase dramatically when a firm applies pesticides on the properties of others. This finding has caused many newcomers to the landscape profession to think twice about offering pesticide services to clients.

Landscape maintenance professionals applying pesticides, including insecticides, fungicides herbicides or growth regulators, to a landscape site are required to post the property with a sign that reads: CAUTION: PESTICIDE APPLICATION….KEEP OFF. Also, the bottom of the sign should read as follows: “This sign may be removed on the day after application.” Firms may also have their name and address printed on the sign. The signs must be 4″ x 5″ in size and made of sturdy, weather resistant material. Contact the Georgia Department of Agriculture for additional information. The Georgia Department of Agriculture also has a source list of manufacturers who make the signs.

Finally, Georgia House Bill 417, passed during the 1993 legislative session, relates to who can and cannot do landscape design work for money. According to this act, only a Registered Landscape Architect can sell his design. A Registered Landscape Architect is one who passes a stringent Landscape Architect’s Certification Exam administered by the American Society of Landscape Architects and is licensed with the GA Secretary of State’s Office). A landscape contractor, designer or retailers (or anyone who is not a Registered Landscape Architect) who performs design services can not charge for his/her design and must follow up by installing the design. Newcomers to the landscape profession need to be aware of this act if they are considering design services as a part of their business.


Center Publication Number: 124
Sooty Mold

Source(s): Randy Drinkard


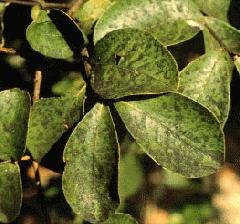
Sooty mold frequently develops on the foliage of many ornamental plants in late summer. It covers the top surface of leaves, thus, reducing the photosynthetic process of the leaf.

soot

Biology

Sooty mold is often not noticed until a large number of leaves are covered with a black sooty substance. This is not really a disease, but a black fungal coating on leaves. Sooty mold is an indicator that there is an insect problem on the plant. The insects feeding on the plant are excreting a sugary substance called “honeydew”. The fungus doesn’t feed on plant tissue but on these secretions from the insects that are feeding on the plant.

Various fungi, Capnodium spp., Scorias sp., Fumago sp., associated with specific insects (aphids, scale, whiteflies and other sucking insects) and plants (fig, crape myrtle, azaleas, tuliptree, oleander, osmanthus and other ornamental plants) produce the sooty mold coating. The feeding of a large number of these insects and the coating of the sooty mold may lead to reduced vigor in the plant. These sucking pests take in large amounts of sap. Much of the water and sugars in the sap pass though the insect and onto the leaf. Rain usually will wash this residue off. If there is insufficient rain then the “honeydew” sticks to the leaf.

Control

To control sooty mold first control the aphids, scales or other pests that are creating the honeydew. Aphids can often be washed off by a strong spray of water from the hose. This action may also wash off some of the “honeydew” and sooty mold. Remaining sooty mold will eventually dry up and flake off the leaves. To control heavy infestations of aphids, scale, mealybugs, etc. on ornamental plants, use acephate(Orthene), malathion, imidacloprid or other recommended insecticides.


Resource(s):

Insect Pests of Ornamental Plants

Center Publication Number: 56

Spring Greenup Problems

Source(s): Clint Waltz, Extension Turfgrass Specialist, The University of Georgia


Warm-season turf grasses such as Bermuda, centipede, zoysia and St. Augustine suffer some common problems with springtime green-up. Here are problems we see most often.

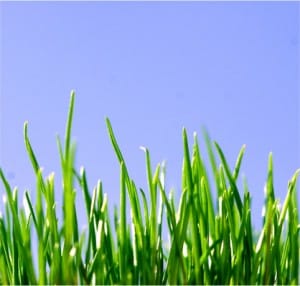
green-grass

Mowing height is the most common problem as these grasses go from dormancy to active growth. Scalping is more common in zoysia grasses, especially in the denser-growth cultivars like Emerald.

Zoysia grasses don’t tolerate scalping as Bermuda will. As a rule, zoysia will be set back anytime it’s cut low enough that you can see the black mold under the leaf canopy. This is generally below the node of the growing leaves. It can occur at any mowing height from as low as 0.5 inches to more than 3 inches.

Regardless of the grass species and normal mowing height, taking the grass down below the node will set it back. Generally, the higher the mowing height, the more this is a problem.

Ideally, maintain Bermuda grass and centipede between 1 and 2 inches, zoysia from 0.5 to 2 inches and St. Augustine from 2 to 3 inches.

Mowing frequency is just as important as mowing height. If you remove more than one-third of the leaf height at a single mowing, the grass will be stressed.

Fertility requirements differ with each grass. Consult your county University of Georgia Extension Service agent or visit www.GeorgiaTurf.com for fertility recommendations.

No matter what the species, though, fertilizing too early in the season, before soils are warm enough to support continual growth, can accelerate green-up but cause detrimental long-term effects.

Fertilizing these grasses in late-winter or early spring can cause them to break dormancy. Then when the inevitable late-season cold snap hits, they’ve used their stored food reserves. They have no energy to withstand environmental extremes. To avoid this, don’t fertilize until the soil reaches 65 degrees.

Thatch, as lawns get older, becomes more problematic, particularly if the turf has been mowed above its recommended height ranges. Increased thatch slows down the turf’s spring transition. It makes it more susceptible to disease, too.

Water — either too much or too little or even a combination of the two — can cause problems for grasses, especially zoysia.
Diseases can strike during spring green-up. The most common is Rhizoctonia large patch, which appears as large areas of blighted grass.

This disease is most active when night temperatures are between 50 and 60 degrees. When conditions are right, it’s common for the disease to become active first in the fall and then again in the spring.

You can see its typical “halo” when the disease is active. Fall and spring fungicide applications can control it. Consult your county UGA Extension agent for proper fungicides and rates.

Applying nitrogen just before or during active infection will increase disease problems.

Cool temperatures make centipede and zoysia slower to green up in the spring.

Microclimates can cause problems, too. Emerald zoysia growing north of Atlanta has been killed by the low temperatures in shaded sites that don’t get much winter sun.

Varietal differences can be troublesome. Some incidences suggest that many types of Emerald zoysia exist in the landscape and green up at different rates.

Cooperative research with the Georgia Crop Improvement Association and Auburn University is under way to evaluate these grass differences.


Resource(s):

Lawns in Georgia

Center Publication Number: 147

Stem Canker of Rose

Source(s): Randy Drinkard


Several fungi are capable of causing stem canker and dieback of roses.

Symptoms:

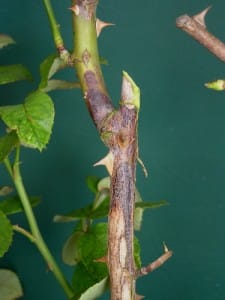
Cankers begin as spots ranging in color from yellow to purple, depending on the causal fungus. The developing cankers become sunken, forming wrinkled or cracked lesions that are tan to black. Canker margins are brown to reddish purple. Numerous small, black, wart-like specks embedded within the canker area are fruiting bodies of the causal fungus. Cankers often enlarge until the stem is girdled. Once the stem is girdled, the foliage above the canker wilts and dies. Cankers that form at the graft union usually result in plant death.

Disease Cycle:

The fungi causing stem canker and dieback usually survive the winter on diseased canes or plant debris. Spores of the causal fungi are usually spread by wind-blown rain or irrigation water. Rose canes are infected through wounds during periods of humid, wet weather. The disease may also be spread by fungus-contaminated pruning tools. Cankers often form on the stub of pruned canes, but they may also be seen around leaf or thorn scars, winter injury, or other damage on the canes. Stem canker and dieback are most damaging to weak, slow-growing roses.

Control:

When establishing or renovating rose beds, always plant canker-free roses and space the plants to allow for good air circulation. Promote good plant vigor and minimize canker damage by irrigating and by fertilizing according to soil test recommendations. Avoid any unnecessary damage when pruning or handling plants. Make pruning cuts just above the node, leaving a small stub to speed callus formation. Remove cankers by cutting 5 to 6 inches below the canker margin. After each cut, dip pruning tools in 70-percent alcohol or a dilution of 1 part household bleach and 4 parts water. This will prevent the further spread of the disease. Treat roses with Daconil, Immunox, Funginex or other recommended fungicides according to label instructions to provide protection from stem canker and dieback.


Resource(s):

Common Landscape Diseases In Georgia

Center Publication Number: 116

Summer Blooming Shrubs

Source(s): Randy Drinkard


The spring landscape is saturated with flowering shrubs. But spring passes and suddenly it’s summer. All that color doesn’t have to disappear, though. Many plants tolerate Georgia’s heat and humidity while providing lots of summer color.

shrub2

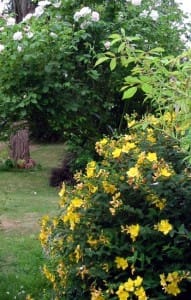
Numerous shrubs are available to Georgia homeowners for providing summer interest in the landscape. Just a few examples of easy-to-grow, summer-blooming shrubs include, althea or Rose of Sharon, bottlebrush buckeye, clethra, chase trees, crape myrtles, hydrangeas, hypericums and spireas.

Hydrangeas welcome the heat of summer to make new growth. The big-leafed hydrangeas produce big, blue, mop-headed flowers that demand attention. The large mounds of foliage support multitudes of flowers, usually mop heads. But occasionally we see a lace-cap plant or two. The flowers are generally blue in our acid soils. But if you lime the soil, the flowers will turn pink or purple.

Two selections are available that keep blooming all summer. ‘Endless Summer’, a new release, and ‘Penny Mac’ keep producing new flowers until frost. Both do best with afternoon shade and a steady supply of moisture.

Our native oakleaf hydrangea forms 6- to 10-foot mounds of foliage from top to bottom. It produces long panicles of white, sterile flowers just above the foliage. These panicles are eight to 12 inches long and fade to a burgundy red as they age. The foliage looks like an enlarged oak leaf. Plants do well in partial shade but require well-drained soils. A great place to plant is on the edge of the woods, where the plants are shaded from the hot afternoon sun.

The peegee hydrangea develops into a large, upright shrub or small tree. The big, white flowers open on new growth in July and August. The selections ‘Tardiva’ and ‘Chantilly Lace’ flower a little later and hold flowers on strong, upright stems. These plants will grow in sun or shade on well-drained soils.

The blue flowers of the chaste tree (Vitex) in July remind us that the flowering season isn’t yet over. The 10- to 12-inch spikes nearly cover the plants. There’s a buzz of excitement, too, as the bees visit each flower. The chaste tree is a fast grower. It reaches 12 to 15 feet tall. The gray-green foliage is usually pest-free. Plants do best in full sun. Flowers develop on new growth, so you need to prune in early spring before growth begins.

Summersweet clethra blooms late, in July and August. This native produces a sweet fragrance that permeates the garden. The spiked clusters of white flowers are 4 to 6 inches long and last three to four weeks. The plants grow 4 to 6 feet tall. They adapt to sun or shade and tolerate heat and drought. The shiny, dark green leaves turn yellow in the fall. Summersweet clethra is a great choice for the shrub border, along lakes and streams or on the edge of the woods.

Be sure to include some flowers and fragrance in your summer landscape. These shrubs make great additions to any landscape. You could even remove an overgrown azalea or two and replace it with some summer excitement to extend your flowering season.


Resource(s):

Landscape Plants for Georgia

Summer Landscape Chores

Source(s): Robert R Westerfield, College of Agricultural and Environmental Sciences, Extension Horticulturist


The summer heat makes it difficult to work outside for long. But some chores in your landscape need to be addressed to keep your plants attractive and healthy.

flower1

Probably the most critical detail right now is the effect of this summer’s recent record heat. Many plants can suffer from extended hot, dry conditions.

Allowing plants to get to the wilting point before watering may cause irreversible damage to some varieties, especially shallow-rooted annuals and perennials.

If water restrictions allow, give these plants a drink at night; or better, early in the morning to avoid the hottest part of the day and the greatest amount of evaporation.

Don’t forget to water your most prized trees as well. It’s easy to replace a $3 annual flower, but nearly impossible to restore a 50-year-old oak.
While walking around your landscape, continue to deadhead flowers of annuals and perennials. This will keep the plants from going to seed in some cases and help them initiate more blooms for the rest of the summer. Deadheading can also lessen the chances of disease and insect attack by removing potential infection sites – dead or decomposing flowerheads.

Check your roses carefully for signs of spidermite damage. Spidermites love the hot, dry weather and will take every opportunity to invade your roses. Keep spraying throughout the growing season with a combination fungicide, insecticide and miticide.

When you need to apply chemicals, do it either very early or very late in the day to avoid burn on the foliage from hot temperatures. Apply insecticides late in the day to avoid killing honeybees as they are usually more active in the early morning hours.

If weeds have been a problem in the flower beds, hand removal may be the best bet. It’s hard to kill mature weeds with chemicals. Spot treatments with a nonselective herbicide such as Roundup or glyphosate may be possible if you’re careful not to contact desirable plants.

Adding a new layer of mulch can go a long way, too, toward controlling unwanted weeds, as well as, helping to keep the soil evenly moist.

Take a close look at vigorously growing shrubs such as privet, hollies and ligustrum. They may need a trim to keep them in shape and away from your windows. Light pruning of the fast-growing shoots won’t harm the plant. And this type of pruning will give plants more compact form. Save heavy pruning, though, for late winter.

Remember to lightly fertilize annual flowers and roses each month. Water the fertilizer in thoroughly after applying to get the nutrients into the plants’ root zone. If you use a liquid fertilizer, read the directions carefully. And don’t apply liquid fertilizers on flowers or foliage during the heat of the day as burn may occur.

Begin soon to plan your fall landscape changes. Many catalogs require you to order now for a fall shipment. Look at the success of your existing landscape and ask yourself if you’re happy with the arrangement, spacing and color.

Draw out what changes you’ll make and begin to check on the availability of plants for this fall. Fall is the ideal time to plant most landscape plants.

When you’ve finished scouting and maintaining your landscape, kick off your shoes in the comfort of your air-conditioning. You’ll feel better knowing tha your landscape is healthy and ready to take on another hot summer day in Georgia.


Resource(s):

Care of Ornamental Plants in the Landscape

Center Publication Number: 97

Summer Vegetable Garden Care

Source(s): Robert R Westerfield, College of Agricultural and Environmental Sciences, Extension Horticulturist


As the days get hotter and drier, keep a watchful eye on your vegetable garden. Careful attention to a few details will help your garden produce a bountiful harvest all summer.

ta

Water Management

Focus your attention on water management first. Most gardens need at least 1 inch of water per week. If it doesn’t rain, apply a half-inch of water twice a week.

Some vegetables may need a little more water, depending on the soil type and temperature. If you can, use soaker hoses or drip irrigation to avoid wetting the foliage. Wet foliage can lead to diseases.

Overhead irrigation is okay – if it’s all you have. As with all watering, though, run irrigation at night or in the early morning hours so as to allow the plants time to dry during the day.

Using a watering can or hose can be effective ways to water small gardens. They make it easy to target the moisture directly to the plant, and no water is wasted between the rows.

Weed and Mulch

Water isn’t the only thing you need to stay on top of this summer. Attention needs to be focused on weeds, too. They can rob moisture and nutrients from vegetables and create competition for space. It’s always easiest to control weeds when they are young and not yet fully rooted. Hand-pulling and hoeing are still the most effective ways to do this task.

Small mini-tillers can be used to quickly chew up weeds found in vegetable rows. Be very careful not to get too close to the plants and injure their roots. For safety’s safe, I till the middle of the rows and then hand-weed closer to the plants.
After weeding, place a few inches of pine straw, wheat straw, old wood chips or other mulch material around your plants to help conserve moisture and keep weeds away.

I use about three sheets of newspaper around my tomato, pepper and squash plants as a base mulch. Then I cover the paper with straw to provide an extra layer of protection against weeds. The newsprint eventually breaks down into organic matter.
Be careful when using grass clippings as mulch, as many people do. You may be introducing more weed seeds into your garden than you ever imagined. Especially if your lawn contains weeds and weed seed heads.

Watch for Good, Bad Bugs

Don’t forget to scout your garden for pest problems. Tomatoes, especially, have a hard time with disease in Georgia’s hot, humid climate. Hand-pick any infected, suspicious-looking leaves. Remove plants completely that are heavily infected with disease. Take samples to your local University of Georgia Extension office if you need help identifying a problem.

Insects can attack your garden during the heat of the summer, too. Inspect your plants carefully for signs of insect damage. Be sure to check the underside of leaves and fruits, as insects often hide there to take advantage of the shade.

Remember that most insects in the garden are actually beneficial and cause no problem to your plants. Make sure you properly identify the insect pest before you spray an insecticide. Again, your county extension agent can help you develop a control regime. Sometimes hand-picking bugs is all it takes if only a few harmful insects are present.

Finally, harvest vegetables as soon as they’re ripe. Leaving them on the plant too long will lead to poor quality and attract more diseases and insects. Picking squash, okra and indeterminate tomatoes frequently can also extend your harvest. If you allow the fruit to stay on the plants too long, they’ll actually shutdown production.


Resource(s):

Vegetable Gardening in Georgia

Center Publication Number: 93

Surface Roots in Lawns

Source(s): Randy Drinkard


Much to the dismay of homeowners, trees sometimes develop roots on the soil’s surface. Surface roots can even buckle sidewalks and driveways. Shallow roots growing in lawns not only create unsightly lumps but they may also cause hazardous mowing conditions.

roots

Although trees do send some roots down deep for moisture and stability, most tree roots tend to grow much more shallowly than most people think – usually only 8 to 12 inches deep. Just as the trunk of the tree grows in girth with age, so do the roots. So over time, some of the shallow, older roots of the tree will naturally enlarge to the surface. Sometimes, roots become visible due to erosion of the surface soil.

Once the roots appear on the surface, there is little that can be done to remedy the situation, without substantially damaging the tree. You can prune off the visible roots, but the damage to the cut roots and the fine feeder roots surrounding the area can harm or even kill the tree. Pruning the roots should be confined to situations where the roots are breaking up sidewalks or driveways.

Some homeowners have tried a temporary solution by applying a shallow, 1-inch layer of good-quality soil mix and then replanting the grass. However, it isn’t long before roots will reappear as they continue to grow in girth. A better solution would be to replant the affected surface area with a type of ground-cover plant that will not need mowing.

The best remedy for surface roots is to choose the proper plants for the situation. But if you already have a large, old tree with surface roots that you don’t want to lose, you may just have to learn to accept its intrusion into the lawn.

Other factors may cause roots to develop near the soil’s surface:

  1. Compacted or heavy clay soils. Tight, heavy soils contain very little oxygen; therefore, root growth is restricted largely to the soil’s surface where oxygen is present. To reduce compaction, loosen the soil around the tree’s roots, if possible. If trees are growing in lawns, aerate these areas to relieve soil compaction and increase soil oxygen levels.
  2. Waterlogged soils. Waterlogged soils have very little oxygen available for proper root growth and development. The oxygen that is available is located near the soil’s surface; thus, roots often develop at or near the surface. If soils become waterlogged, reduce watering and improve the drainage; avoid planting young trees in overly-wet locations.
  3. Light or shallow irrigation. Plants growing in or near lawns that are not deeply watered often develop shallow roots near the soils’s surface. Apply enough water to throughly wet the soil to a depth of six to eight inches. In the absence of plentiful rainfall, applying one inch of water weekly to lawns should supply ample moisture to the proper depth.
  4. Natural growth tendency. Some trees and shrubs just naturally develop shallow roots near the soil’s surface. Examples of plants that develop shallow root systems include; alders, elms, figs, honeylocusts, mulberrys, poplars, maples, sycamores and willows. Do not plant these or other shallow- rooted trees in or near lawn areas.

Center Publication Number: 221

Take Care of Garden Tools

Source(s): Stephen D Pettis


Winter is a tough time for avid gardeners. We struggle to find something to do in the yard after all of the leaves are raked, the perennials divided and the pruning is done. We turn to UGA football for some relief but, alas, it ends all too soon. We rack our brains and scour gardening books for ideas but eventually wind up wandering aimlessly around our yards in the months of January and February when the weather is nice enough to get outside.

Inevitably we wind up in the tool shed. There we see all our tools there still dirty and grimy from the summer’s toil. Your favorite shovel has red clay caked on it, the pruners are nearly stuck with sticky sap in the blades, and both are dull. Our hosepipe lies in a heap like a dead snake in the corner and the wheelbarrow has a flat tire. The spirit lifts now that some purpose has come back into the poor gardener’s existence. There are tools to be maintained.

The first tool to get the treatment should be our favorite shovel. This tool is, after all, the one instrument that sees the most use in the garden and serves us unfailingly all summer. Using a strong stream of water and a brush, remove any caked on mud and plant debris. Be sure to pay attention to the shank (the area where the handle inserts into the shovel blade) because bits of roots, soil, and plant debris can get stuck in there. This a good place for plant diseases to hang out until next year.

Next sharpen the business end of the blade to a working edge not a razor’s edge. A working edge is one that is slightly blunt (a 15-20 degree angle) and is not quite sharp enough to cut you. It will last much longer than a narrow edge. Use a wire brush or some steel wool to clean any remaining debris and rust from the blade. Apply a light coat of oil to the blade. If the shovel has a wooden handle, use sand paper to smooth any rough patches and oil with linseed or tung oils. Store your shovel for the winter by hanging it on the wall instead of standing it up in the corner to avoid damage to the edge.

After working on the shovel, tackle the pruners. Use a rag and a solution of bleach to clean the blades of bypass and anvil pruners. Scrub any difficult to remove crud with steel wool and oil the hinge and spring with a household lubrication product such as WD40. Sharpen the blade to a 40-45 degree angle with a metal file being extra careful not to cut yourself. ALWAYS WEAR GLOVES WHEN SHARPENING TOOLS! If the pruners have removable blades, consider replacing them. Store the pruners in a locked cabinet or drawer to prevent children from playing with them and getting hurt.

Finally, take care of that old wheelbarrow. Clean the tire, handles and the tray with water and soap. Tighten any nuts or screws that might have loosened over the summer. Read the tire pressure requirement on the side of the tire and fill it with air. Use a bicycle tire pump instead of an air compressor. A really powerful compressor can burst a wheelbarrow tire sending tire shreds flying. Most wheelbarrows have sealed wheel bearings so greasing or oiling the wheel isn’t necessary. On the off-hand chance yours has a grease fitting, use regular trailer grease and a grease gun. Store the wheelbarrow inside if you can or if you have to store it outside, turn it upside down to prevent water from standing in the tray.

There are many tools in our shed that we seldom use or that don’t really require much maintenance. Simply hose off your pick, mattock, flat shovel and rakes. Drain and roll up your hoses. Hang all of your tools if you have the means to keep them from taking up too much room in the corner. Hopefully, maintaining your gardening tools will keep you busy for a while and prevent you from wandering aimlessly around your yard…like I do.

Take-All Root Rot of St. Augustinegrass

Source(s):

  • Jeff Michel
  • Jacob G Price

Introduction

Take-All Root Rot, Gaeumannomyces graminis var. graminis, has recently emerged as a destructive disease in Georgia. The disease is a problem in many other southern states as well. Take-All Root Rot is most common in St. Augustinegrass lawns, but affects all warm season turfgrasses.

Symptoms/Signs

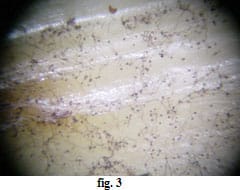
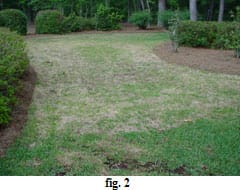
The naturally occurring pathogen first causes root damage which leads to noticeable symptoms such as yellowing leaf blades and dark roots (fig.1). In advanced stages (fig.2) the turf severely thins and begins dying in an irregular pattern. When the first disease symptoms are observed, the disease has been active for weeks. Dark, threadlike strands called hyphae along with anchoring structures called hyphopodia (fig. 3) can be seen under a dissecting microscope on the stolons, roots, and rhizomes of warm season grasses. The disease is primarily observed in spring and fall and is associated with high levels of moisture due to rainfall or irrigation.

Cultural Controls

If rainfall is not adequate and irrigation is used, water infrequently but deeply. Mow the turf at the correct height and remove only 1/3rd of the leaf blade per mowing. Core aerate to reduce thatch and relieve soil compaction. Use slow release fertilizers with equal amounts of nitrogen and potassium. Avoid high nitrogen applications in the fall. Texas A&M and UGA research has shown some benefit from applying ¼”of sphagnum peat moss or 2 pounds per thousand square feet of Manganese Sulfate. Avoid liming as the pathogen prefers a pH above 6.5. Avoid activities that stress turf such as herbicide applications. If turfgrass is not stressed, foliar symptoms may not be present.

Chemical Controls

This Disease is difficult to control and once advanced, there is no silver bullet. If Take-All Disease is known to be present, preventive fungicide applications may be of benefit after cultural controls have been implemented. Fungicides applied in early spring and fall such as Rubigan (fenarimol), Heritage (azoxystrobin), Banner Max (propiconazole), Bayleton (triadimefon), Cleary’s 3336 (thiophanate methyl), and Insignia (pyraclostrobin), may help control Take-All Root Rot. Apply these fungicides with 2.5-3.0 gallons of water, per thousand square feet to reach the root system or lightly water in the fungicide.


Resource(s):


Reviewer(s):

Ellen Bauske, Program Coordinator, UGA Center for Urban Agriculture, The University of Georgia College of Agricultural and Environmental Sciences.

Center Publication Number: 8