Landscape Alerts and Updates – MAY 2017

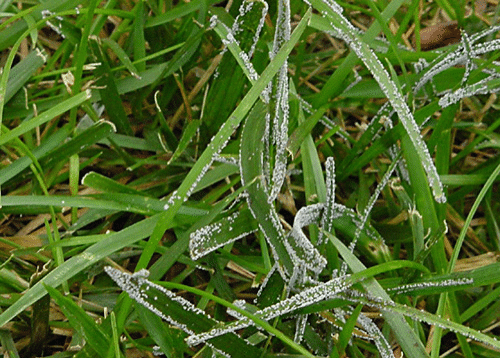
Slime Mold on Turfgrasses

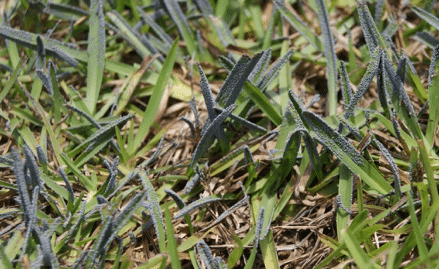
Has your lawn been slimed?  Fear not, the grayish-black sooty substance on your turfgrass is a harmless soil protozoa that has temporarily migrated onto blades and stems to produce and disperse spores.  Diagnosis: Slime Mold,  Physarum and Fuligo sp./spp.  The occurrence is prompted by spells of humid, rainy weather during spring and early summer and is typically short-lived (1-2 weeks).  Aside from temporarily hindering photosynthesis, slime molds do not parasitize or damage the turfgrass.   Slime mold can be ignored, mowed, raked, or washed off with a pressurized stream of water.

Related Articles: what-is-this-unusual-growth-on-lawns


Lawn Burweed

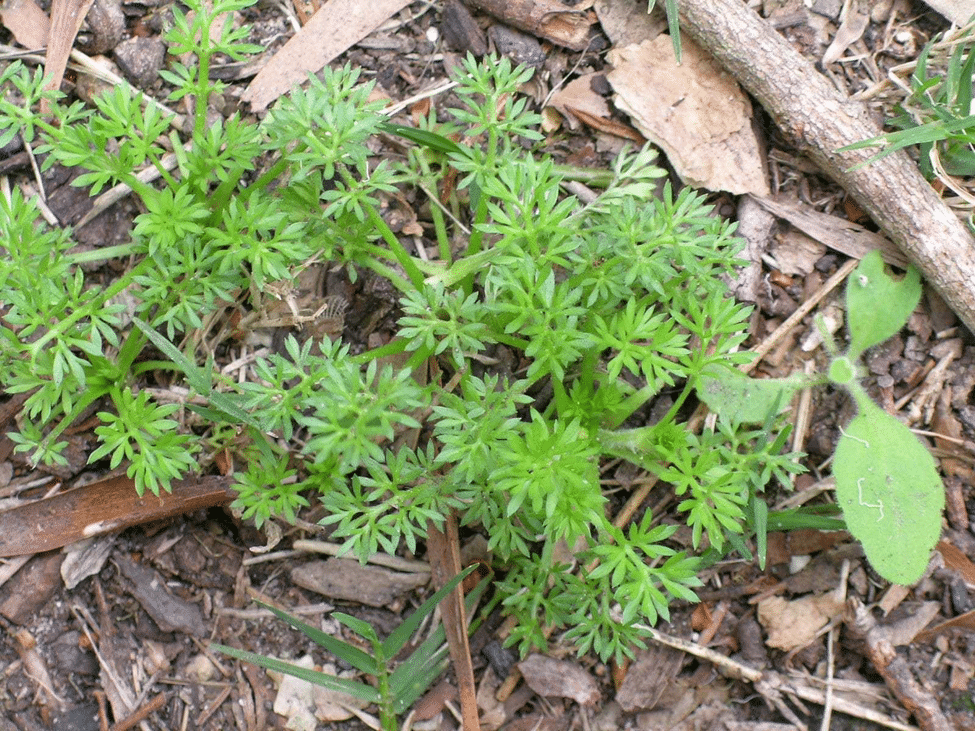
If you missed the window of opportunity to manage burweed in your lawn in late winter/early spring, then you may be feeling it, literally!  The seed burs are now mature and a barefoot stroll across the lawn may inflict you with some painful hitchhikers.  At this point, applying a broadleaf herbicide product may kill the weed, but will not eliminate the existing burs that have formed, so mark your calendars for burweed scouting and control next February.  If an immediate solution is needed, locate individual plants and physically remove them.  Burweed tends to colonize compacted bare areas. For large areas of infestation it may be necessary to scalp and bag the clippings with a mower to remove the burs, followed by turfgrass renovation or establishment on those areas (assuming that you have a warm-season turfgrass species such as bermudagrass, it would not be advisable to scalp a Tall Fescue lawn in May).  For more information on scouting for lawn burweed, refer to the previous post “Winter Scouting for Lawn Burweed.”

Related articles: winter-scouting-for-burweed-soliva-pterosperma


Turf Aerification

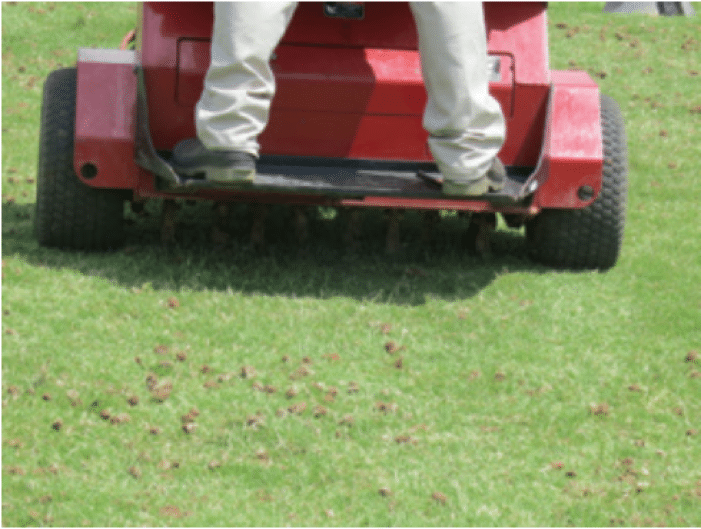
Now is the time to aerify warm-season turfgrasses.  Last year, the dry conditions persisting from August through December depleted carbohydrate reserves in warm-season turfgrasses. A delay in turfgrass green-up was common this spring and warm-season turfgrasses are poised to replenish carbohydrate reserves and restore root systems.  “If there is a year to seriously consider core aerification, this is it,” says Dr. Clint Waltz, a Cooperative Extension turfgrass specialist with the University of Georgia College of Agricultural and Environmental Sciences.  Core aerification relieves compaction, improves air exchange and water infiltration, and stimulates deeper root growth.  Hollow-tine aerification is the preferred method, removing soil cores to a depth of 3-4 inches, and having longer-lasting benefits.  A light fertilizer application in concert with aerification can be beneficial, but heavy nitrogen applications should be avoided to allow for the replenishment of carbohydrate reserves (over-stimulating top growth depletes carbohydrates reserves).

To make sure soil pH, phosphorus and potassium levels are within recommended ranges for optimum growth, take a soil sample to your local University of Georgia Cooperative Extension office.

Read the full article on Core Aerification and find lawn care calendars for different turfgrass species at www.GeorgiaTurf.com .

Related Articles and Publications:

Turfgrass Fertility: Soil Texture, Organic Matter, Aeration, and pH (C 1058-1)


Insect Scouting Hints

Insect scouting is an important part of integrated pest management, whether you are a large scale farmer or just “farm” a 4′ X 8′ raised bed.   Here are some hints to help you scout successfully so that you can manage garden insect pests:

Hint #1  Look under plant leaves

Damaging insects often stay on the underside of leaves or in leaf crevices and plant whorls.  Check those areas carefully.

Hint #2  Look for insect eggs

Insect eggs are small and by spotting and removing them you limit future damage.  Squash bug eggs are a good example.

Hint #3  Confirm insect identification

The majority of insects are not harmful to your plants.  Many are actually beneficial and can help you manage pests.   If you are unsure of an insect identification contact your local UGA Cooperative Extension office for confirmation.  Oftentimes you can send your agent a photo and that is all he/she needs to assist you.

This lady beetle larva looks menacing but is really helpful in the garden. Photo: bugguide.net

Hint #4  Scout at night

Some insects do their damage at night.  Grabbing a flashlight and scouting after dark could yield some interesting results.

Happy Scouting!

Simple Raised Beds for Your Georgia Garden

Josh Fudor, UGA ANR Agent in Cherokee County, developed this simple raised bed design that is perfect for community or school gardens.  This is the plan that we use in our teacher training workshops and the teachers appreciate the simplicity.

Simple Raised Beds for Your Georgia Garden
Teachers find this raised bed design easy to construct.

Gardening in raised beds is an easy way to get started growing great vegetables. The benefit of raised bed gardening includes: ease of management, prevention of soil compaction, better drainage, longer growing season, and ease of soil improvement.

Raised beds can be constructed out of just about any material and there are a number of kits available that are quick and easy to assemble. With a few tools and minimal time commitment the ambitious gardener can construct their own and save money.

Materials List

Qty.

Material

Cost

3

8’ 2”x10” Boards (cost will vary depending on choice, i.e. cedar, pine, treated) We will use treated pine for this example

37.00

16

1⁄4” x 4” Galvanized Lag Screws

14.50

16

1⁄4” zinc plated washer

1.90

1

Cubic yard or 27 cubic feet of soil/compost mixture

40.00

* Prices may vary depending on location and if delivery is required

Total: $ 93.40

Tools Needed

  • Saw-hand or electric powered
  • Speed square
  • Tape measure
  • Drill
  • 1⁄4” socket driver bit
  • 3/16” drill bit for pre-drilling
  • Safety Glasses and gloves

Step One:

Choose the straightest boards with little to no knot holes. This will make things much easier and make for a longer lasting finished product.

Step Two:

Cut one of the 8’ 2×10” boards in half. 8’ boards should 96” long but be sure to measure first just to be safe.

Step Three:

Make a notched cut out of the ends of all the boards. These notches provide added stability to the bed without the use of additional reinforcement. A 10” board is actually 9 1⁄4” wide so the mid-point of the board is 4 5/8” a cut 1 1/2” deep is needed to ensure the boards are flush at the corners.

The graphic below shows what the cuts should look like on all 4 of the boards when done, note that the notches are cut out on opposite sides of the board, this should be done on all boards.

Simple Raised Beds for Your Georgia Garden
Figure 1: Notch Cut Detail: 4 5/8” x 1 1/2” notch to be removed from opposite ends of all boards

Step Four:

Once all 4 boards have been notched on opposite sides of the board, lay them out to form the box. If cuts were made to proper measurements the boards should fit together smoothly. Pre-drill 2 holes in each end of all the boards approximately 3/4” from the end of the board. See Figure 2 below:

Simple Raised Beds for Your Georgia Garden
Figure 2: End of board detail – position of holes for lag screws.

Step Five:

Afer holes have been pre-drilled place one washer on 4” lag screw and drive them through the pre-drilled holes. 16 lag screws will be inserted with 4 on each corner.

Step Six:

Position bed in a location that receives at least 6-8 hours of direct sunlight on a North-South axis.

Happy Raised Bed Gardening!

Celebrating Compost at Marietta City Schools

To celebrate International Compost Awareness Week I asked Michelle Gambon, a Cobb County Master Gardener who volunteers at Marietta City Schools, for a great compost story.  Anyone who knows Michelle knows she is passionate about composting and inspires those around here.  She sent us this:
When asked to reflect on the value of compost six grader Jaylin Cabrera, Marietta City Schools wrote:

What is composting? By: Jaylin Cabrera, 6th Grade, age 11

Composting is nature’s process of recycling decomposed organic materials into a rich soil known as compost. Composting transforms garden and other vegetable waste into a dark, rich productive soil amendment that gardens call “Black Gold.” Composting is nature’s way of recycling . Composting is also a natural biological process. Composting comes in many different ways for example worm composting.

What is compost? Compost is an organic matter , such as raw food scraps  from fruits like apples or bananas,fallen leaves ,and coffee grounds ,that has been decomposed and recycled to use as fertilizer for growing new plants . Why is composting important ? Composting is beneficial in many ways it is used as an organic fertilizer for soil and greatly contributes to a cleaner environment by composting your raw food scraps you are reducing the amount of trash that is put into a landfill and recycling pollutants in the air.

Celebrating compost at Marietta City Schools
Jaylin Cabrera , writer and lover of compost

During each lunch period an average from 13 to 18 pounds of vegetative waste is saved from the landfill. Under the guidance of a Cobb County Master Gardener volunteer, our Middle Grades Earth Ambassadors compost over three lunches twice a week totaling 540 pounds per week 2655 pounds per school year. That is a lot of “BlackGold.”

We are proud of biodiversity full of good bugs and beneficial organisms. We are always sure to keep all levels of brown and green waste true to science therefore keeping temperatures uninhabitable for anything dangerous. We are smart about the food chain and are sure to never have any animal byproducts in our compost, keeping it’s kept strictly vegetative.  Because our students are so knowledgeable there is never any worry of inviting critters with eyes, (beside a bird or two who want a snack.) Teachers in Science Math, Social Studies and ELA offer many outdoor classroom experiences benefited through our diverse ecosystem.
Thank you, Michelle and Jaylin, for the great things you are doing! 
Happy Compost Week!

Farm to School Week and the Golden Radish

The Golden Radish Award is a way to recognize school systems who engage in farm to school activities.  University of Georgia Extension is proud to be a partner in this very worthwhile program.  Across the state UGA Extension agents work in Farm to School efforts.  This includes Agriculture and Natural Resources Agents (ANR), Family and Consumer Science Agents (FACS) and 4-H Agents.

UGA ANR Agent James Morgan assisting students in their school garden at Turner Elementary School.

Farm to School Successes in Georgia

From the project website, almost one-third of Georgia school districts were recognized for their farm to school work during the 2015-2016 school year. Awardees collectively:

  • Served 39 million school meals that included local food
  • Held 8,246 taste tests of fresh, local food to students
  • Taught 3,406 garden, food and nutrition lessons to students
  • Tended 575 edible school gardens
  • Hosted 1,935 hands-on cooking activities with students
  • Incorporated farm to school into 390 staff professional development opportunities
  • Championed and sustained district-wide policies or procedures into 29 schools districts

How Can You Earn the Golden Radish?

If you work in a school garden you could be on the way to earning the Golden Radish award.   Having an edible school garden and conducting student taste tests are two of the ways to start qualifying for the award.  Other possible criteria include hosting a farmer to your school, integrating farm to school activities into school curriculum and having students work with local chefs to create delicious meals.  If a teacher from the school attends any of UGA’s school garden teacher trainings, that also counts towards the award.

Applications are Now Open

Applications are now open for the 2017 Golden Radish Award.  Applications are due by June 30, 2017 and the online application is easy to use and with save and return capability! Application details, award criteria, and examples of programs and activities that meet the criteria requirements are available at the website.

Let Extension know if we can help!

Happy Farm to School Week!


The Five Step Felling Plan – Step 3 – Plan Your Escape Route

The Five Step Felling Plan - Step 3 - Plan Your Escape Route

You need a safe, clear escape route when felling a tree.

90-15-5 Rule

90% of the accidents during felling occur within 15 seconds after the tree moves and within 5 ft of the trunk. This is called the 90-15-5 rule.

Within the radius of the tree there are two high danger zones and two safer retreat routes. The first and largest high danger zone occupies a half circle from the center of the tree going outward in the direction of the fall. The second high danger zone is a quarter-circle area in the direction opposite the felling direction. You can be hurt in this area if the trunk jumps the stump, sets back, or the tree barber chairs.

Escape Route

Your escape route is in the 45-degree angles between these danger zones. Your retreat distance should be a minimum of 20 feet from the falling tree. Clear away all obstacles – such as debris or brush – that might slow you down or trip you up. You should be able to make your escape without turning your back on the falling tree.

Once you’ve identified your escape path, communicate your plan of work and retreat route to others on the work site. Discuss potential hazards; co-workers may have observed something you missed.

If the escape route is so important, why wait till the third step of the felling plan? The escape route is determined by the direction of tree fall. You will need to determine the height of the tree, identify hazards, measure lean, and assess your available equipment before you can fully determine the felling direction. If you change the felling direction for any reason, you need a new escape route.

This guy knows how to clean up his escape route.